

Introduction
Modern & Responsive Symfony Bootstrap 5 Admin Template for All Your Web Projects
Vyzor Symfony is a premium Bootstrap 5 Admin Template that combines modern and minimal design with full flexibility and responsiveness. It’s crafted using HTML5,CSS3, and Bootstrap 5, offering seamless customization with SASS integration. Whether you’re building a web application, admin dashboard, or project management platform, this template ensures your site stands out with ease.
Support and Updates:
When you purchase Vyzor, you gain access to free future updates to ensure your template remains up-to-date. Plus, our support team is always ready to assist with any questions.
Dependencies for Vyzor
- PHP : "8.2.12",
- Composer : "2.8.5",
- Symfony/Framework : "7.3.0",
- Bootstrap v5.3.3
- NPM :- 10.8.1
- Node :- 20.10.0
- Sass
What Do You Get with the Vyzor:
Vyzor provides all necessary Twig , CSS, SCSS, JS files, along with detailed Documentation to help you easily customize and implement the template.
Vyzor Compatibility with Popular Browsers:
Vyzor is fully compatible with major browsers, ensuring a seamless user experience across Chrome, Firefox, Safari, Edge, and Opera.
Folder Structure
Base File Structure
Base file structure of the Vyzor template .Root:templates/base.html.twig
The base.html.twig file serves as the base file for all Twig pages in the Vyzor template.
html
    <!DOCTYPE html>
<html lang="en" dir="ltr" data-nav-layout="vertical" data-theme-mode="light" data-header-styles="transparent" data-width="fullwidth" data-menu-styles="transparent" data-page-style="flat" data-toggled="close" data-vertical-style="doublemenu" data-toggled="double-menu-open">

    <head>

        <!-- Meta Data -->
        <meta charset="UTF-8">
        <meta name='viewport' content='width=device-width, initial-scale=1.0'>
        <meta http-equiv="X-UA-Compatible" content="IE=edge">
        <meta name="Description" content="Symfony Bootstrap Responsive Admin Web Dashboard Template">
        <meta name="Author" content="Spruko Technologies Private Limited">
        <meta name="keywords" content="admin dashboard bootstrap, admin panel bootstrap template, admin panel symfony, bootstrap template admin panel, bootstrap template dashboard, bootstrap template for admin, dashboard admin template, dashboard template bootstrap, dashboard ui design, symfony bootstrap template,  symfony dashboard, symfony template, symfony ui, template bootstrap symfony, template symfony.">

<!-- Title -->
        <title> {% block title %}Vyzor - Symfony Bootstrap 5 Premium Admin & Dashboard Template {% endblock %}</title>

        <!-- Favicon -->
        <link rel="icon" href="{{absolute_url(asset('build/images/brand-logos/favicon.ico'))}}" type="image/x-icon">

        {% block stylesheets %}
        {{ include('layouts/styles.html.twig') }}
        {% endblock %}

    </head>

    <body class="">

        <div class="progress-top-bar"></div>

        <!-- Loader -->
        <div id="loader" >
            <img src="{{absolute_url(asset('build/images/media/loader.svg'))}}" alt="">
        </div>
        <!-- Loader -->

        <!-- Start::main-switcher -->
        {{ include('layouts/switcher.html.twig') }}
        <!-- End::main-switcher -->

        <!-- Start:age -->
        <div class="page">

            <!-- Start::main-header -->
            {{ include('layouts/main-header.html.twig') }}
            <!-- End::main-header -->

            <!-- Start::main-sidebar -->
            {{ include('layouts/main-sidebar.html.twig') }}
            <!-- End::main-sidebar -->

            <!-- Start::app-content -->
            <div class="main-content app-content">
                <div class="container-fluid page-container main-body-container">

                    {% block body %}{% endblock %}

                </div>
            </div>
            <!-- End::app-content -->

            <!-- Start::main-footer -->
            {{ include('layouts/footer.html.twig') }}
            <!-- End::main-footer -->

            <!-- Start::main-modal -->
            {{ include('layouts/modal.html.twig') }}
            <!-- End::main-modal -->

            {% block modal %}{% endblock %}

        </div>
        <!-- End:age -->

        {% block javascripts %}
        {{ include('layouts/scripts.html.twig') }}
        {% endblock %}

    </body>

</html>
1. To ensure consistency across all pages, use the base file as the base layout for each Twig page. This allows for central management of shared elements like headers, footers, and sidebar. To achieve this, include the following code at the top of each Twig file:
code
{% extends 'base.html.twig' %}Twig Page View Code (for example, the Twig "example.html.twig " file code)
code
{% extends 'base.html.twig' %}

{% block stylesheets %}
    {{ parent() }}

{% endblock %}


{% block body %}

{% endblock %}


{% block javascripts %}
{{parent()}}

{% endblock %} - First, unzip the project folder that you received from us.
- Navigate as shown Example: C:\xampp\htdocs\vyzor\templates Open templates folder will have 175 html.twig pages
- Navigate as shown Example: C:\xampp\htdocs\vyzor\templates\layouts\ Open layouts folder there you will find footer.html.twig, main-header.html.twig, main-sidebar.html.twig, modal.html.twig, scripts.html.twig, styles.html.twig, and switcher.html.twig etc files
- Navigate as shown Example: C:\xampp\htdocs\vyzor\templates\ Open templates folder there you will find base.html.twig, landing-base.html.twig, custom-base.html.twig files
- Here base.html.twig file is the base file for all the twig pages.
- Here custom-base.html.twig file is the base file for all custom pages ex: sign-in-basic.html.twig, sign-up-cover.html.twig, error404.html.twig, error500.html.twig, comingsoon.html.twig, create-password-cover.html.twig and create-password-basic.html.twig etc..,
- Here landing-base.html.twig file is the base file for only landing page ex: landing.html.twig
Installation Process of Composer
In order to run Symfony we need to install composer by the following steps
Steps to Download & Installation of Composer
Step1: Please visit the Official Web Site of the Composer www.getcomposer.org
Step2: Click on the Download option
Step3: Click on the Composer-Setup.exe you are done with download
Step4: Now Right click on the Composer-Setup.exe file and select Run as administrator click on Yes
Step5: You'll be getting two options click as per your choice
Step6: I choose Recommended option here and if your developer you can check the box of the Developer Mode
Step7: And click on the Next button please make sure of installation path and then click Next
Step8: You'll be asked to enter proxy url please skip the step and click on the Next button
Step9: Please make sure with the PHP Version it should not be less than 8.0v, here we used 8.1.12 Version and then click on the next button
Step10: To confirm that Composer is installed in your system then type Composer in command prompt (if you are using XAMPP then go to C:\xampp\htdocs location and type composer)
How to Run Symfony Project in localhost
If you have installed XAMPP on your machine then please follow the below steps
Step:1 Quick view of Installations
1. Download and Install the Composer from official site https://getcomposer.org/
2. Install Symfony by using Composer as mentioned in the installation process above.
Step:2 Run project
1. Extract the zip folder of the Symfony project in the path: EX: C:\xampp\htdocs\ that you have received after purchase.
2. Once the extraction is completed for accessing the Symfony project, open command prompt or terminal and set your project root path: Example: C:\xampp\htdocs\
3. Now run the below commands in the terminal to get the output of the project.
To get the node_modules install.
code
npm installTo get the build assets of the project.
code
npm run buildFinally, run the command line: to get the Symfony development server. so that you can see the output of the project.
code
php -S 127.0.0.1:8000 -t publicSymfony development server started: http://127.0.0.1:8000, now type the url in the browser to access the project.
Note: Please run npm install and npm run build commands before you run the development server or project.
How to Use Symfony
Recommended LTS (long term support) version of Node.js.
Download latest version of node.js from nodejs.org
Install Node.js using .exe downloaded file.
To check your node version, run node -v in a terminal/console window (cmd)
1. Go to your project folder and there you will find a file called package.json.
2. Open the file in your editor and make sure that all the dependencies are correct as shown below
- "copy-webpack-plugin": "^13.0.0",
- "terser-webpack-plugin": "^5.3.14",
- "@popperjs/core": "^2.11.8",
- "@simonwep/pickr": "^1.9.0",
- "@tarekraafat/autocomplete.js": "^10.2.7",
- "@yaireo/dragsort": "^1.3.2",
- "@yaireo/tagify": "^4.33.2",
- "animejs": "^3.2.2",
- "apexcharts": "^4.7.0",
- "etc...,"
3. And now set your project root path in terminal or command prompt Example: cd C:\Users\my-project and type the below command line.
code
npm install4. Wait until all the dependencies are downloaded to your project folder.
5. Now you can see the downloaded folder with the name of node_modules in your project folder.
6. Once you completed with the customization work you need to run your project in Production Mode in order to run Production Mode run the below command line
code
npm run buildPurpose of a Starter Kit
Introduction to the Symfony Template Starter Kit:
The Symfony template starter kit is a resource that helps developers kickstart their Symfony web development projects by providing a preconfigured and ready-to-use template. It aims to simplify the initial setup and provide a foundation for building Symfony-based websites or applications.
Purpose of the Symfony Template Starter Kit:
The purpose of the Symfony template starter kit is to save developers time and effort by offering a set of prebuilt files and configurations commonly used in Symfony projects. Instead of starting from scratch, developers can leverage the starter kit to quickly set up a project structure that adheres to best practices and industry standards.
Benefits of Using the Symfony Template Starter Kit:
The starter kit eliminates the need to set up the basic project structure manually. It provides a well-organized file and folder structure, including commonly used directories for separating code, templates, assets, and configuration files. This allows developers to focus more on implementing business logic rather than spending time on initial setup.
Before using the Symfony template starter kit, developers should have a basic understanding of Symfony and web development concepts. Additionally, they should have a web server environment Symfony installed on their local machines or a hosting server. Familiarity with HTML, CSS, and JavaScript is also beneficial for frontend development aspects.
Starterkit Overview
You can use the Starterkit if you are creating a new project. It will be time-consuming to use the full admin version for a new project as Vyzor have more than 175 html.twig pages.
We have provided all the pre-build layouts like Sidemenu, Header, Footer and Scripts etc in the Starterkit.
For further information or support regarding the template, please contact us using the provided link:https://support.spruko.com/
- Take a look at the folder structure of the "Starterkit."
- Integration of your customized html.twig pages becomes easy when using the "Starterkit."
- The "Starterkit" provides all the layout components and related assets.
- To explore the contents of the "Starterkit," unzip the project folder received after purchase. Navigate to the following paths:
- Example: templates/layouts - This folder contains files such as footer.html.twig, main-header.html.twig, scripts.html.twig, and main-sidebar.html.twig, etc.
- Example: templates/dashboards/new folder create - Add your html.twig pages here if you have more.
FAQ'S
Step 1:
Go To style.scss (assets/scss/styles.scss)
if you want to change another font-family Go to the site Google Fonts And Select One font Family and import in to styles.scss file
How to Select font Family
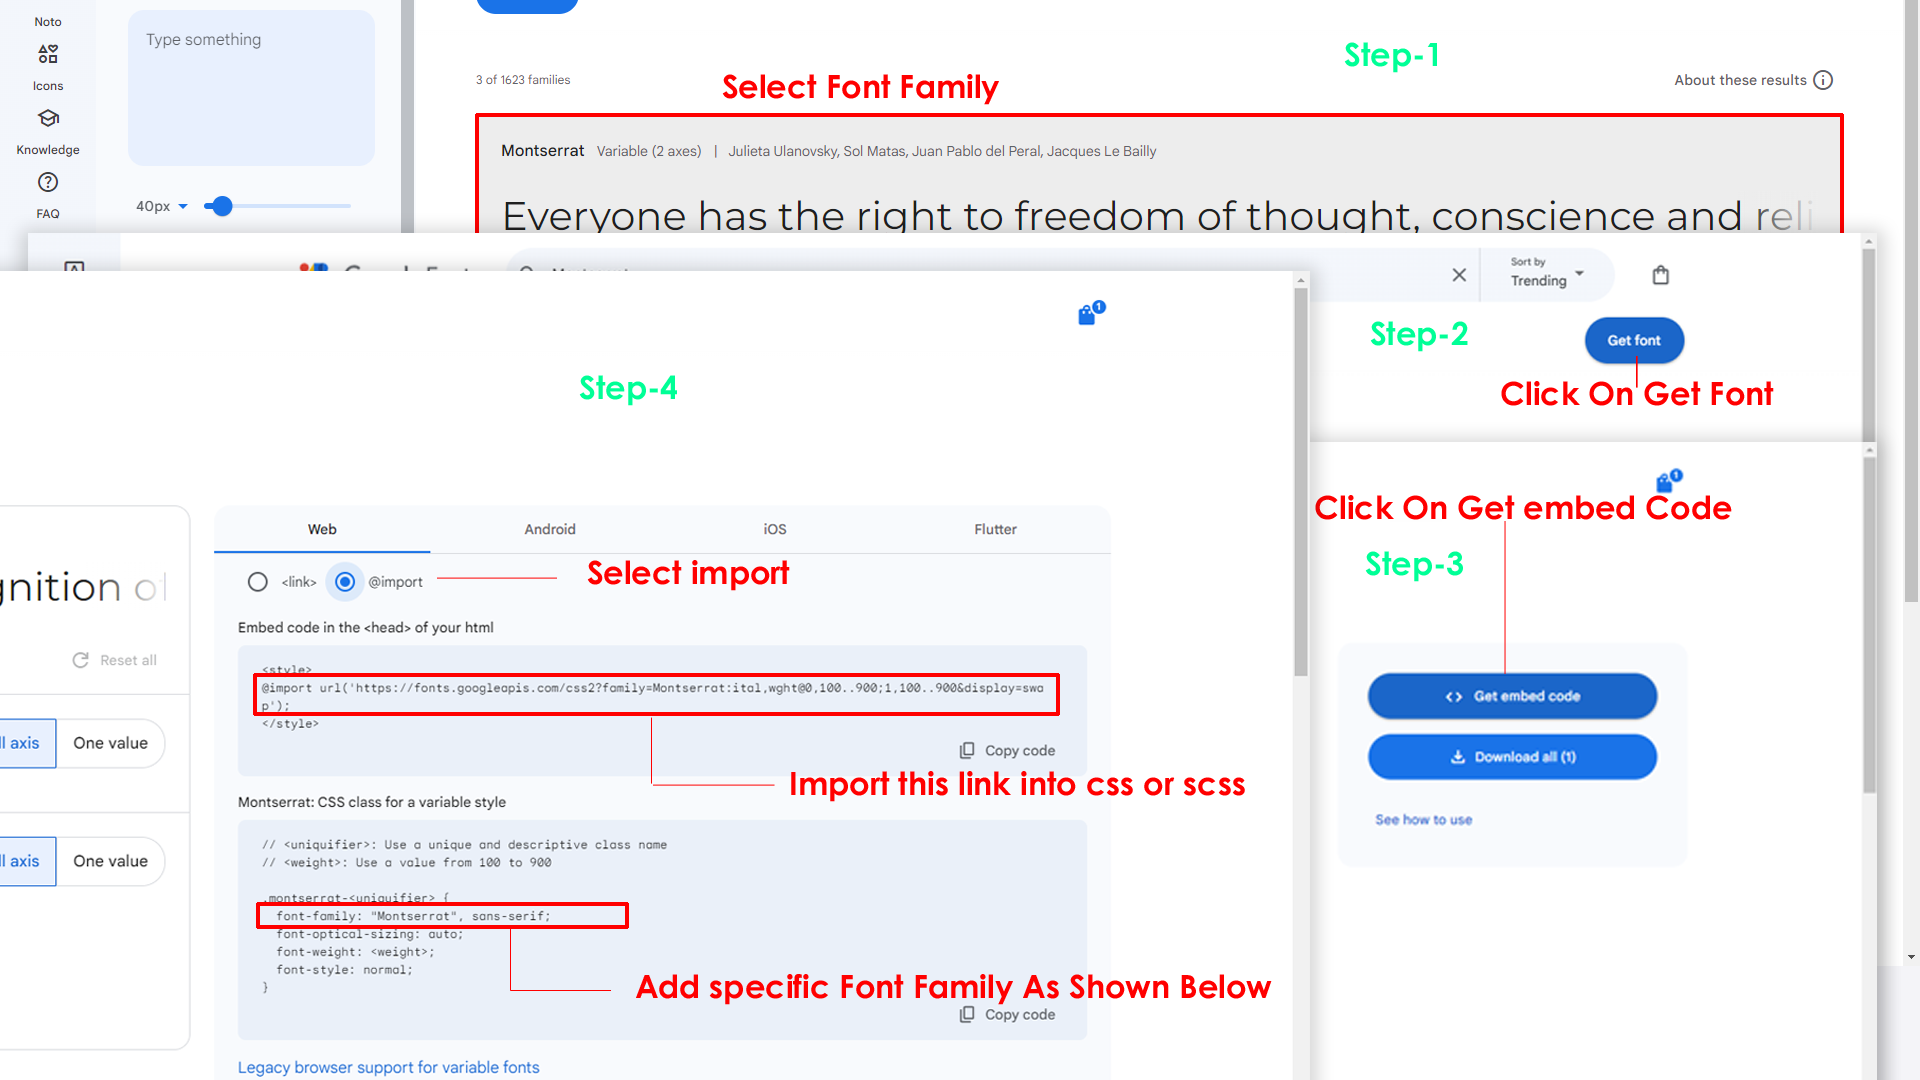
Step 2:
And paste Your Selected font-family in style.scss

Step 3:
And add the Your Selected font-family in _variables.scss(assets/scss/_variables.scss)
code
--default-font-family: "Space Grotesk", sans-serif;NOTE:- You must perform npm run dev the command after changing or modifying the content in the assets folder; otherwise, those changes you've made will not be applied to your template.
By default menu icons are phosphoricons if you want to change To change Menu icons, open main-sidebar.html.twig page Path:templates/layouts/main-sidebar.html.twig and go through app-sidebar section, in that section you will find phosphoricons of menu in svg tag, there you can replace previous icon with your icon. Example as shown in below
html
html
Go To "assets/images/brand-logos" folder and replace
your
logo with Previous Logos within in image size.
note: Please don't increase logo sizes. Replace your logo within
given
image size. otherwise the logo will not fit in particular place it
disturbs the template design.
NOTE:- You must perform npm run dev the command after changing or modifying the content in the assets folder; otherwise, those changes you've made will not be applied to your template.
Step1:
To clear LocalStorage loading functions you need to remove
localStorageBackup2() function in custom-switcher.js assets/js/custom-switcher.js as shown
below
code
function localStorageBackup2() {}Step2:
To remove complete LocalStorage saving you need to remove
all localstorage related calling functions like localStorage.setItem,
localStorage.removeItem, localStorage.getItem,
localStorage.clear in
custom-switcher.js
assets/js/custom-switcher.jsfile.Below are the some examples to find out.
code
localStorage.setItem( ;
localStorage.removeItem( ;
localStorage.getItem(
localStorage.clear();
localStorageBackup();
Step3:
To remove complete LocalStorage saving you also need to remove
main.js link present in styles.html.twig Path:templates/layouts/styles.html.twig as shown below
code
<!-- Main Theme Js -->
<script src="{{absolute_url(asset('build/js/main.js'))}}"></script>
Step1:
To remove switcher path remove below code shown in base.html.twig templates/base.html.twig file
code
<!-- Start::main-switcher -->
{{ include('layouts/switcher.html.twig') }}
<!-- End::main-switcher -->
Step2:
After removing switcher path in base.html.twig page then change main-header to main-header1 for switcher icon code shown below in base.html.twig page
code
 Before :
    <!-- Start::main-header -->
    {{ include('layouts/main-header.html.twig') }}
    <!-- End::main-header -->

After :
    <!-- Start::main-header -->
    {{ include('layouts/main-header1.html.twig') }}
<!-- End::main-header -->Step1:
To remove switcher path remove below code shown in landing-base.html.twig templates/landing-base.html.twig file
code
<!-- Start::main-switcher -->
{{ include('layouts/landingpage/switcher.html.twig') }}
<!-- End::main-switcher -->
Step2:
After removing switcher path in landing-base.html.twig page then change main-header to main-header1 for switcher icon code shown below in landing-base.html.twig page
code
 Before :
    <!-- Start::main-header -->
    {{ include('layouts/landingpage/main-header.html.twig') }}
    <!-- End::main-header -->

After :
    <!-- Start::main-header -->
    {{ include('layouts/landingpage/main-header1.html.twig') }}
    <!-- End::main-header -->
Step3:
Now then change main-sidebar to main-sidebar1 for switcher icon code shown below in landing-base.html.twig page
code
 Before :
    <!-- Start::main-sidebar -->
    {{ include('layouts/landingpage/main-sidebar.html.twig') }}
    <!-- End::main-sidebar -->

After :
    <!-- Start::main-sidebar -->
    {{ include('layouts/landingpage/main-sidebar1.html.twig') }}
<!-- End::main-sidebar -->Please follow the below steps to change Primary Color
Step 1 :
To change Primary Color you have to open _variables.scss file and replace what color you want as shown in below
Rootpath : _variables.scss (assets/scss/_variables.scss)

NOTE:- You must perform npm run dev the command after changing or modifying the content in the assets folder; otherwise, those changes you've made will not be applied to your template.
Please follow the below steps to change Dark body Color
Step 1 :
Make sure the theme is set completely to dark mode by adding the following attributes to the html tag data-theme-mode="dark" data-header-styles="dark" data-menu-styles="dark"
Step 2 :
To change Dark body Color you have to open _variables.scss file and replace what color you want as shown in below
Rootpath : _variables.scss (assets/scss/_variables.scss)

Step 3 :
Also Change the following variable colors to the desired theme background accordingly in [data-theme-mode="dark"]
--light-rgb : --form-control-bg : --input-border : --gray-3 :NOTE:- You must perform npm run dev the command after changing or modifying the content in the assets folder; otherwise, those changes you've made will not be applied to your template.
Credit's
Icons Credit
| Icons | References |
|---|---|
| Bootstrap Icons | https://icons.getbootstrap.com/ |
| Boxicons | https://boxicons.com/ |
| Remix Icons | https://remixicon.com/ |
| Feather Icons | https://feathericons.com/ |
| Tabler Icons | https://tabler-icons.io/ |
| Line Awesome Icons | https://icons8.com/line-awesome |
| Phosphor Icons | https://phosphoricons.com/ |
Images Credit
| Images | References |
|---|---|
| Vecteezy | https://www.vecteezy.com/ |
| Iconscount | https://iconscout.com/ |
| Unsplash | https://unsplash.com/ |
| Png Tree | https://pngtree.com/ |
| flaticon | https://www.flaticon.com/authors/flat-icons |
| freepik | https://www.freepik.com |
Fonts Credit
| Font | References |
|---|---|
| Google Fonts | https://fonts.google.com/ |
Sidemenu Icons
| Icon | References |
|---|---|
| phosphor Icons | https://phosphoricons.com/ |
Switcher styles
(Root:templates/base.html.twig)
html
<html lang="en" dir="ltr" data-nav-layout="vertical" data-theme-mode="light" data-header-styles="transparent" data-width="fullwidth" data-menu-styles="transparent" data-page-style="flat" data-toggled="close" data-vertical-style="doublemenu" data-toggled="double-menu-open">html
data-theme-mode="light" data-header-styles="light" data-menu-styles="light"html
data-theme-mode="dark" data-header-styles="dark" data-menu-styles="dark"html
dir="ltr"html
dir="rtl"html
data-nav-layout="vertical"html
data-nav-layout="horizontal" data-nav-style="menu-click"html
data-page-style="regular"html
data-page-style="classic"html
data-page-style="modern"html
data-page-style="flat"html
data-width="default"html
data-width="full-width"html
data-width="boxed"html
data-header-position="fixed"html
data-header-position="scrollable"html
data-vertical-style="closed"html
data-vertical-style="icontext"html
data-vertical-style="overlay"html
data-vertical-style="detached"html
data-vertical-style="doublemenu"html
loader="enable"html
loader="disable"html
data-menu-styles="light"html
data-menu-styles="dark"html
data-menu-styles="color"html
data-menu-styles="gradient"html
data-menu-styles="transparent"html
data-header-styles="light"html
data-header-styles="dark"html
data-header-styles="color"html
data-header-styles="gradient"html
data-header-styles="transparent"html
data-bg-img="bgimg1"html
data-bg-img="bgimg2"html
data-bg-img="bgimg3"html
data-bg-img="bgimg4"html
data-bg-img="bgimg5"