



Introduction
Ynex - Blazor WebApp Webassembly Bootstrap5 Premium Admin & Dashboard Template
Ynex - Blazor WebApp Webassembly Premium Bootstrap5 Admin Template, With these template formats, it's very easy to create a presence and grab someone's attention around the web page Because the template is built using razor, C#, CSS3, Bootstrap 5 framework and with Sass. So please before you start working with the template take a quick look on the documentation so that you can easily built your website. If You Love Our Template Design Please don't forgot to rate it. Thank you so much! 😊
Support and Updates:
When you purchase Ynex, you gain access to free future updates to ensure your template remains up-to-date. Plus, our support team is always ready to assist with any questions.
Dependencies for Ynex
- .NET 10.0.102 SDK
- Visual Studio Code or Visual Studio 2026
- C# for Visual Studio Code
- Bootstrap v5.3.8
- Sass
- NPM
- Node : 24.16.0
What Do You Get with the Ynex:
Ynex provides all necessary Razor, CSS, SCSS, JS files, along with detailed Documentation to help you easily customize and implement the template.
Ynex Compatibility with Popular Browsers:
Ynex is fully compatible with major browsers, ensuring a seamless user experience across Chrome, Firefox, Safari, Edge, and Opera.
Core Folder Structure
Installation Process of .NET SDK
Step 1: Visit the official .NET SDK download page.
Step 2: Click on the Download .NET SDK button.
Step 3: Run the installer to install the SDK on your system.
How to Run the Blazor Core Development Server
Using Visual Studio Code
- Unzip the project folder you received.
- Open the project folder in Visual Studio Code.
- Open a terminal and make sure you are in the server project directory: (
ynex) rather than the ynex.Client
Then run the development server:
Command
dotnet builddotnet watch --project ynex
Using Visual Studio
- Unzip the project folder.
- Open the
.slnxfile. - Ensure
ynex(the server/host project) is set as the Startup Project, notynex.Client. - Press
F5to run the application.
Purpose of a Starter Kit
Introduction
The Blazor Core Starter Kit helps developers quickly start a project with a clean, ready-to-use structure. It includes layouts and components commonly used in modern web apps.
Benefits
- Saves setup time with a pre-built project structure.
- Includes components like Sidebar, Header, Footer, etc.
- Helps organize Razor components, templates, and assets.
- Easier integration of your custom Razor pages.
Important Files
ynex/Components/App.razor– Root component.ynex.Client/Layout/MainLayout.razor– MainLayoutynex.Client/Layout/CustomLayout.razor– Layout for auth and error pages.ynex.Client/Layout/LandingLayout.razor– Layout for the landing page.ynex.Client/Layout/NavMenu.razor,MainHeader.razor,Footer.razor, etc. – UI layout components.
For more support, visit: https://support.spruko.com/
MSBuild-Based Asset Pipeline
Ynex uses MSBuild targets to manage frontend assets in a structured and automated way. All tasks are executed as part of the standard ASP.NET Core build lifecycle.
This approach avoids introducing a separate JavaScript build system (such as esbuild or Gulp) and keeps asset processing fully aligned with the .NET build process.
Pipeline Responsibilities
- Ensures Node.js dependencies (node_modules) are installed
- Copies libs from
ynex.Client/node_modulestoynex.Client/wwwroot/assets/libs - SCSS files are compiled into CSS.
Why MSBuild?
MSBuild is used as the single orchestration layer for frontend assets to ensure consistency across development, CI/CD, and production builds.
- Runs automatically during
dotnet build - No separate frontend build commands required
- Works consistently across local and server environments
- Avoids duplicate or out-of-sync build pipelines
Automatic npm Dependency Handling
The build pipeline requires Node.js dependencies to be available in node_modules
because frontend assets (such as copying npm libraries, SCSS processing, and PostCSS transforms)
are executed during dotnet build.
To support both local development and CI environments, an MSBuild target named
HandleNpm ensures that dependencies are available before the build continues.
<PropertyGroup>
  <!-- Detect CI environment (Azure DevOps, or generic CI=true) -->
  <IsCI Condition="'$(CI)' == 'true' Or '$(TF_BUILD)' == 'true'">true</IsCI>
</PropertyGroup>

<Target Name="HandleNpm" BeforeTargets="Build">

  <!-- CI behavior: CI pipelines MUST explicitly run 'npm ci' before 'dotnet build'.
  This ensures deterministic, reproducible builds. -->
  <Error Condition="'$(IsCI)' == 'true' And !Exists('node_modules')"
         Text="node_modules not found. Run 'npm ci' in the CI pipeline before building." />

  <!-- Local development behavior: If node_modules is missing, dependencies are installed automatically.
    This runs only once and will not repeat if node_modules already exists. -->
  <Exec Command="npm install --no-audit --no-fund"
        Condition="'$(IsCI)' != 'true' And !Exists('node_modules')" />

</Target>
This approach ensures:
- Fast local development (automatically installs node_modules if not exists.)
- Strict CI reproducibility
- Reliable frontend asset processing during
dotnet build
Npm Package libraries Management
-
npm packages are managed through
ynex.Client/package.json. To install a package, usenpm install <package-name>to ensure consistent dependency versions across all environments. Before installing, make sure you are in theynex.Clientdirectory in the terminal. -
When
dotnet buildis executed, MSBuild copies the required package libs fromynex.Client/node_modulestoynex.Client/wwwroot/assets/libs, making them available for runtime use.
If you need to install a new npm package, open a terminal and navigate to the ynex.Client directory. Install the package using command: npm install <package-name>, After the installation is complete, stop the server and run dotnet build. The configured MSBuild targets will automatically copy the package libraries from ynex.Client/node_modules to ynex.Client/wwwroot/assets/libs.
    <Target Name="CopyVendorAssets" AfterTargets="Build">
    <Message Importance="high"
            Text="Auto-resolving and copying vendor assets..." />

    <Copy SourceFiles="@(AllFiles)"
            DestinationFolder="wwwroot\assets\libs\%(Folder)\%(RecursiveDir)"
            SkipUnchangedFiles="true" />
    </Target>
The pipeline intelligently detects whether a package exposes a dist, min, umd
directory and copies optimized files when available.
If no dist folder exists, the package contents are copied instead.
SCSS to CSS Compilation
SCSS to CSS compilation automatically happens during dotnet build using the configured MSBuild and npm pipeline.
This process converts all SCSS files into CSS and applies the necessary PostCSS transformations and minification as part of the build workflow.
The MinifyAndPrefix MSBuild target defined in ynex.Client/ynex.Client.csproj triggers the npm-based build pipeline:
<Target Name="MinifyAndPrefix" BeforeTargets="Build" DependsOnTargets="HandleNpm">
    <Message Importance="high" Text="Post-processing CSS: Autoprefixing and Minifying..." />
    <Exec Command="npm run sass:build" />
</Target>
This executes the sass:build script defined in ynex.Client/package.json:
"scripts": {
  "sass:watch": "sass --watch --style=expanded --no-source-map wwwroot/assets/scss:wwwroot/assets/css",
  "sass:build": "sass --style=expanded --no-source-map wwwroot/assets/scss:wwwroot/assets/css && npm run css:prefix && npm run css:minify",
  "css:prefix": "postcss wwwroot/assets/css/styles.css -o wwwroot/assets/css/styles.css && postcss wwwroot/assets/css/icons.css -o wwwroot/assets/css/icons.css",
  "css:minify": "postcss wwwroot/assets/css/styles.css --use cssnano -o wwwroot/assets/css/styles.min.css && postcss wwwroot/assets/css/icons.css --use cssnano -o wwwroot/assets/css/icons.min.css"
}
- sass:build compiles SCSS files from
wwwroot/assets/scssinto CSS. - css:prefix runs PostCSS to apply transformations such as Autoprefixer (via PostCSS configuration).
- css:minify uses cssnano to generate minified production CSS files.
- sass:watch can be used during development to automatically rebuild CSS on file changes.
The PostCSS configuration is defined in ynex.Client/postcss.config.js:
module.exports = {
    plugins: [
        require('postcss-import'),
        require('autoprefixer')
    ]
};
- postcss-import enables modular CSS using
@importand bundles files together. - Autoprefixer automatically adds vendor prefixes for cross-browser compatibility.
When you run dotnet build, the following steps are executed automatically:
- npm dependencies are installed if
node_modulesis missing. - Vendor packages from
ynex.Client/node_modulesare copied toynex.Client/wwwroot/assets/libs. - The
sass:buildnpm script is executed. - SCSS files are compiled into CSS. ( PostCSS processes CSS files (imports + autoprefixing), cssnano generates minified CSS files for production ).
Watch Mode:
During development, navigate to the ynex.Client directory in the terminal and run npm run sass:watch to automatically rebuild CSS whenever SCSS files are modified.
All frontend asset tasks are fully automated through MSBuild and npm scripts, ensuring a consistent, repeatable, and production-ready build pipeline.
Asset Pipeline Overview
The project uses configured MSBuild targets and npm scripts to compile SCSS files into CSS, and to copy npm package libraries from ynex.Client/node_modules into ynex.Client/wwwroot/assets/libs.
PostCSS is used to apply autoprefixing and minification to the generated CSS.
Recommended Development Flow
-
Always run
dotnet buildfirst, then start the application usingdotnet watch --project ynex. -
Although
dotnet watch --project ynexperforms a build before starting, it may run an incremental build and some MSBuild targets (such as copying libs) may not execute fully. -
Therefore, if
ynex.Client/wwwroot/assets/libsis missing, the project may start successfully, but some components can fail with missing library errors because the required libs are not copied fromnode_modules.
During development, execute npm run sass:watch to watch SCSS changes automatically, so you do not need to manually recompile or restart the server because we have added the watch script in ynex.Client/package.json:
"scripts": {
  "sass:watch": "sass --watch --style=expanded --no-source-map wwwroot/assets/scss:wwwroot/assets/css",
}
Adding a New npm Package
If you need to install a new npm package, open a terminal and navigate to the ynex.Client directory. Install the package using command: npm install <package-name>, After the installation is complete, stop the server and run dotnet build. The configured MSBuild targets will automatically copy the package libraries from ynex.Client/node_modules to ynex.Client/wwwroot/assets/libs.
FAQ'S
Step 1:
Go To style.scss (ynex.Client/wwwroot/assets/scss/styles.scss )
if you want to change another font-family Go to the site Google Fonts And Select One font Family and import in to styles.scss file
How to Select font Family
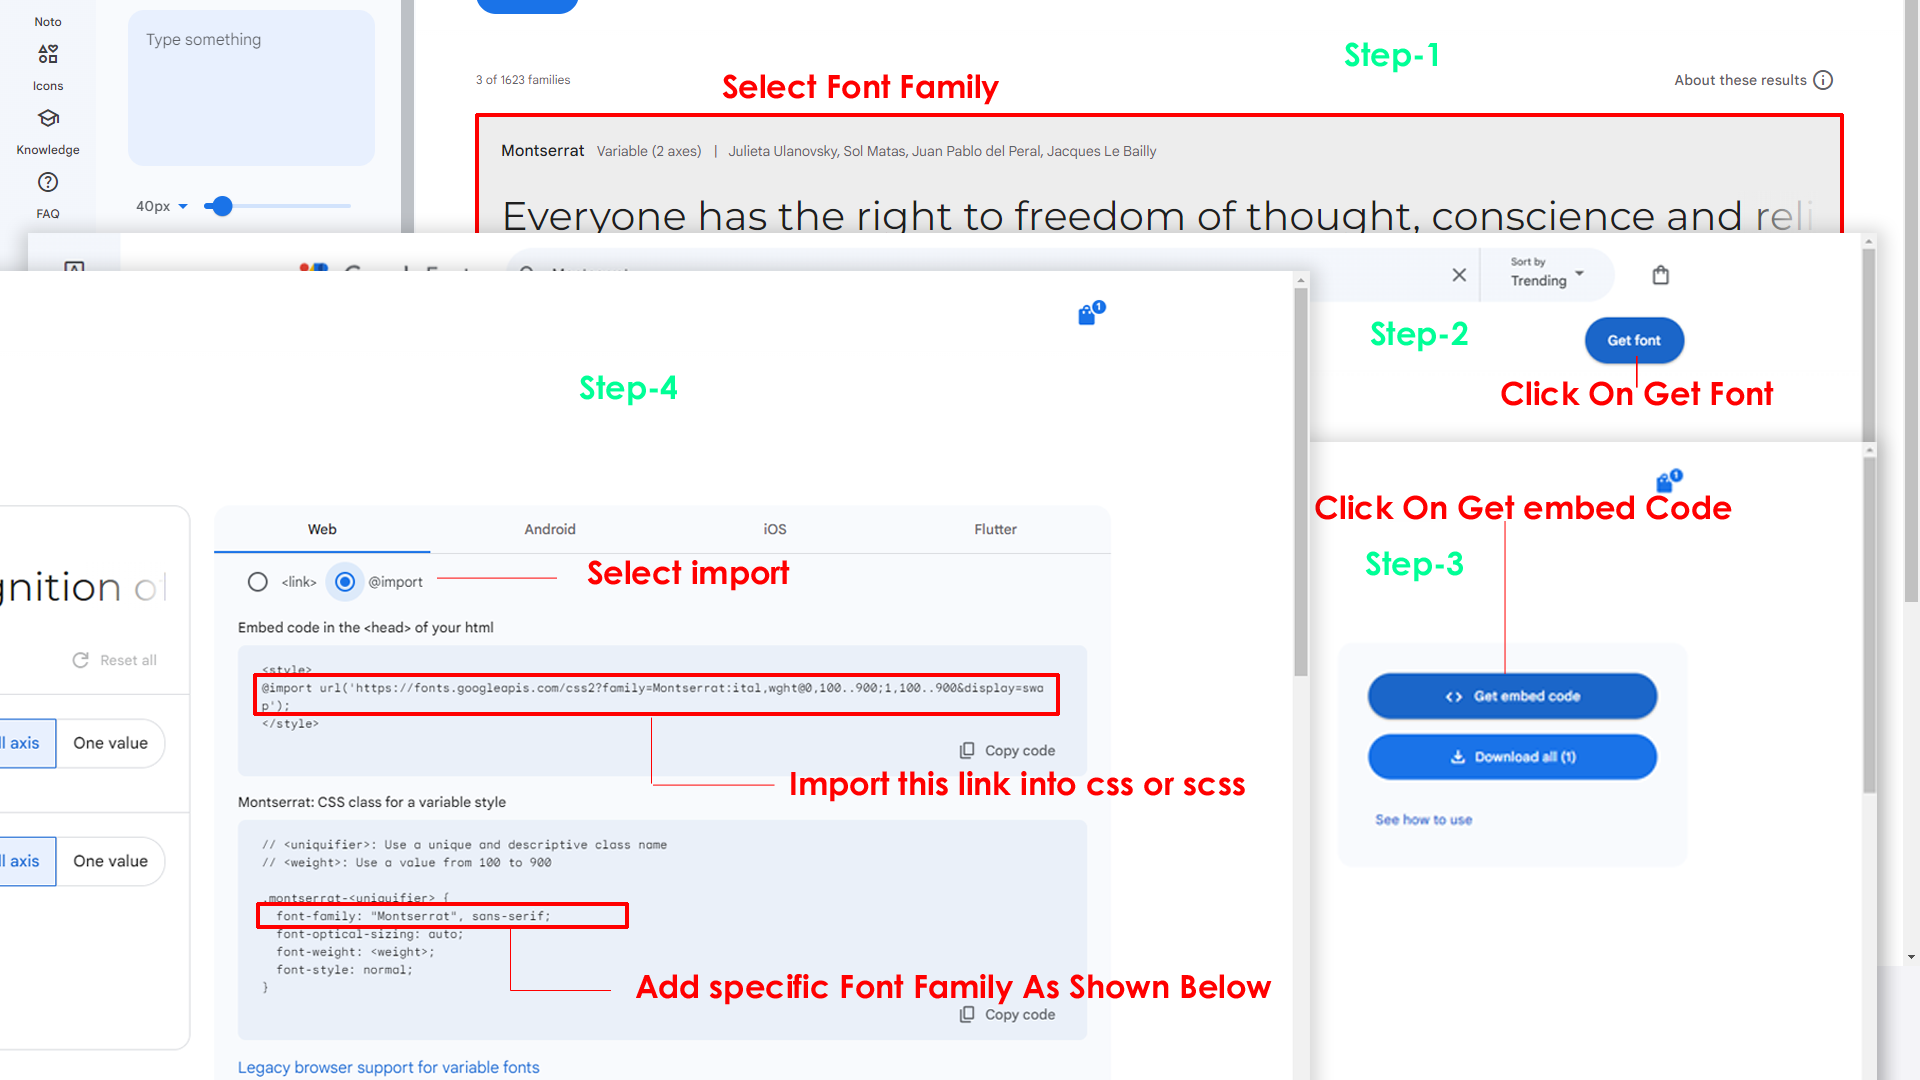
Step 2:
And paste Your Selected font-family in style.scss

Step 3:
And add the Your Selected font-family in _variables.scss(ynex.Client/wwwroot/assets/scss/_variables.scss)
code
--default-font-family: "Space Grotesk", sans-serif;By default menu icons are Boxicons if you want to change icons please follow below steps
Step :
To change Menu icons, open MenuData.Service.cs file Path: ynex.Client\Services\MenuDataService.cs and go through
MainMenuItems, you can find the icon property as icon: "bx bx-home",
in the place of bx bx-home you can replace it with the required image as it will append to the class for i tag.
To Add the New link element, open MenuData.Service.cs page ynex.Client\Services\MenuData.Service.cs and go through the object where you are want to place the new menu element.
To Add the New menu element, open MenuData.Service.cs page ynex.Client\Services\MenuData.Service.cs and go through the object where you are want to place the new menu element.
To Remove the link/sub element, open MenuData.Service.cs page ynex.Client\Services\MenuData.Service.cs and go through the object which you are intended to remove.
Go To "ynex.Client/wwwroot/assets/images/brand-logos" folder and replace
your
logo with Previous Logos within in image size.
note: Please don't increase logo sizes. Replace your logo within
given
image size. otherwise the logo will not fit in particular place it
disturbs the template design.
Please follow the below steps to change Primary Color
Step 1 :
To change Primary Color you have to open _variables.scss file and replace what color you want as shown in below
Rootpath : _variables.scss (ynex.Client/wwwroot/assets/scss/_variables.scss )

Please follow the below steps to change Dark body Color
Step 1 :
Make sure the theme is set completely to dark mode by adding the following attributes to the html tag data-theme-mode="dark" data-header-styles="dark" data-menu-styles="dark"
Step 2 :
To change Dark body Color you have to open _variables.scss file and replace what color you want as shown in below
Rootpath : _variables.scss (ynex.Client/wwwroot/assets/scss/_variables.scss )
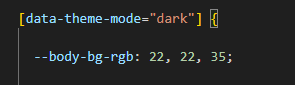
Step 3 :
Also Change the following variable colors to the desired theme background accordingly in [data-theme-mode="dark"]
--light-rgb : --form-control-bg : --input-border : --gray-3 :If you want to remove switcher in your template follow the below process.
Go to root path:
ynex.Client/Layout/ open
"MainLayout.razor" in that file, remove the Switcher Path as shown in below
    Switcher path:

        BEFORE :

            Remove this(<Switcher />)

        AFTER :

            (removed switcher path)
Go to root path:
ynex.Client/Layout/ open
"MainHeader.razor" in that file, then remove below mentioned code.
        <!-- Start::header-element -->
        <div class="header-element">
            <!-- Start::header-link|switcher-icon -->
            <a href="javascript:void(0);" class="header-link switcher-icon" data-bs-toggle="offcanvas" data-bs-target="#switcher-canvas">
                <i class="bx bx-cog header-link-icon"></i>
            </a>
            <!-- End::header-link|switcher-icon -->
        </div>
        <!-- End::header-element -->
Need to remove complete StateService file located at path : ynex.Client/Services/StateService.cs file.
NOTE: "If the switcher is not used in the template, you can remove the StateService.cs file. If , some pages use the switcher, do not remove StateService.cs, because removing it will affect all layouts and the switcher functionality will stop working. so, only remove icon and code"
NOTE: The switcher is different for landing pages, if you want to remove switcher to the landing pages then follow the process.
Go to root path: ynex.Client/Layout/LandingLayout.razor open "LandingLayout.razor" in that file, below the body tag remove the Switcher Path as shown in below.
    Switcher path:

        BEFORE :

            Remove this(<LandingSwitcher  />)

        AFTER :

            (removed switcher path)
Go to root path:
ynex.Client/Layout/LandingHeader.razor open
"LandingHeader.razor" file and then remove mentioned code as shown in below.
<button class="btn btn-icon btn-success switcher-icon" data-bs-toggle="offcanvas" data-bs-target="#switcher-canvas">
	<i class="ri-settings-3-line"></i>
</button> Go to root path: ynex.Client/Layout/JobsLandingLayout.razor open "JobsLandingLayout.razor" in that file, below the body tag remove the Switcher Path as shown in below.
    Switcher path:

        BEFORE :

            Remove this(<LandingSwitcher  />)

        AFTER :

            (removed switcher path)
Go to root path:
ynex.Client/Layout/LandingHeader.razor open
"LandingHeader.razor" file and then remove mentioned code as shown in below.
<button class="btn btn-icon btn-success switcher-icon" data-bs-toggle="offcanvas" data-bs-target="#switcher-canvas">
	<i class="ri-settings-3-line"></i>
</button>
Credit's
Icons Credit
| Icons | References |
|---|---|
| Bootstrap Icons | https://icons.getbootstrap.com/ |
| Boxicons | https://boxicons.com/ |
| Remix Icons | https://remixicon.com/ |
| Feather Icons | https://feathericons.com/ |
| Tabler Icons | https://tabler-icons.io/ |
| Line Awesome Icons | https://icons8.com/line-awesome |
Images Credit
| Images | References |
|---|---|
| Vecteezy | https://www.vecteezy.com/ |
| Iconscount | https://iconscout.com/ |
| Unsplash | https://unsplash.com/ |
| Png Tree | https://pngtree.com/ |
| flaticon | https://www.flaticon.com/authors/flat-icons |
| freepik | https://www.freepik.com |
Fonts Credit
| Font | References |
|---|---|
| Google Fonts | https://fonts.google.com/ |
Sidemenu Icons
| Icon | References |
|---|---|
| Boxicons | https://boxicons.com/ |
Switcher styles
StateService.cs
    public string ColorTheme { get; set; } = "light";                   // light, dark
    public string Direction { get; set; } = "ltr";                      // ltr, rtl
    public string NavigationStyles { get; set; } = "vertical";          // vertical, horizontal
    public string MenuStyles { get; set; } = "";                        // menu-click, menu-hover, icon-click, icon-hover
    public string LayoutStyles { get; set; } = "default-menu";          // doublemenu, detached, icon-overlay, icontext-menu, closed-menu, default-menu
    public string PageStyles { get; set; } = "regular";                 // regular, classic, modern
    public string WidthStyles { get; set; } = "fullwidth";              // fullwidth, boxed
    public string MenuPosition { get; set; } = "fixed";                 // fixed, scrollable
    public string HeaderPosition { get; set; } = "fixed";               // fixed, scrollable
    public string MenuColor { get; set; } = "dark";                     // light, dark, color, gradient, transparent
    public string HeaderColor { get; set; } = "light";                  // light, dark, color, gradient, transparent
    public string ThemePrimary { get; set; } = "";                      // '58, 88, 146', '92, 144, 163', '161, 90, 223', '78, 172, 76', '223, 90, 90'
    public string ThemeBackground { get; set; } = "";                   //make sure to add rgb valies like example :- '58, 88, 146' and also same for ThemeBackground1
    public string ThemeBackground1 { get; set; } = "";
    public string BackgroundImage { get; set; } = "";                   // bgimg1, bgimg2, bgimg3, bgimg4, bgimg5
Nuget Packages Included :
-
If you need a new NuGet package open a terminal and navigate to the
ynex.Clientdirectory. Install it using the commanddotnet add package <package-name>. For example,dotnet add package Newtonsoft.Json. -
After running the command, the package will be added to your project and referenced in the
ynex.Client/ynex.Client.csprojfile.
NPM Plugins & Reference Links
All plugins runs through npm.
If you need to install a new npm package, open a terminal and navigate to the ynex.Client directory. Install the package using command: npm install <package-name>, After the installation is complete, stop the server and run dotnet build. The configured MSBuild targets will automatically copy the package libraries from ynex.Client/node_modules to ynex.Client/wwwroot/assets/libs.