noa - Symfony Bootstrap 5 Admin & Dashboard Template
Introduction
Welcome to noa - Symfony Bootstrap 5 Admin & Dashboard Template
noa - Symfony Admin Template, With these template formats, it's very easy to create a presence and grab someone's attention around the web page Because the template is built using HTML5, CSS3, Bootstrap 5 framework and with Sass. So please before you start working with the template take a quick look on the documentation so that you can easily built your website.
If You Love Our Template Design Please don't forget to rate it. Thank you so much! 😊
Dashboard
- Updated Date: 25/JULY/2022
- Author: SPRUKO™
- Company: Spruko Technologies Private Limited
- Support: support@spruko.com
Thank you for purchasing our admin template. Feel free to contact us any time. We have The Best dedicated team to provide you the best support. If you have any queries please reach us through live chat or email:- sprukotechnologies@gmail.com
Template Description
noa– is a Symfony Bootstrap 5 Admin & Dashboard template using modern and minimal design. It is fully flexible user-friendly and responsive. noa admin template is powered with HTML 5, SASS, & Bootstrap 5 which looks great on Desktops, Tablets, and Mobile Devices. This Template Includes 110+ Twig Pages & 50+ Plugins more UI elements . No Need to do hard work for this template customization. We already designed it and you can easily design your website just how you like it. Advanced Form-Elements like Date pickers, form elements are included. This template using Bootstrap5 framework. This admin template is fully 100% Premium Admin Templates quality. This template designed for using HTML5,CSS3,Jquery. After Purchased this template you will get All Twig files,CSS, Scss and JS Files.
It has super clean flat user interface admin Backend design, easy customizable components and widgets.The Template comes with a awesome unique design also we ensure you can easily design admin template.
It is a fully responsive layout for all type of devices. Works on all major web browsers, Desktop, iPhone, iPad, Tablet and all other smart phone devices
Once you Purchase Our noa - Symfony Bootstrap 5 Admin & Dashboard Template you’ll be getting all the TWIG, CSS3, Scss & JS files and you are enabled to get free downloads of all the future updates.
Main Features
- Vertical Menu
- Horizontal Click Menu
- Horizontal Hover Menu
- RTL Ready
- 110+ Twig Pages
- Bootstrap 5 Responsive Framework
- Well Commented Code
- 24 * 7 Professional Company Support
- Regular Updates
- 50+ Plugins
- 5 Types of Charts
- About US
- Blog
- Flie Manager
- Gallery
- Project Pages
- Ecommerce Pages
- Settings Page
- Blog Details
- Calendar
- Select2
- Mail Inbox
- 10 Types of Icons
- File upload
- Message Chat
- Tickets
- Month & Date & Year Range Pickers
- Form Elements
- Form Editor
- Form Wizard
- Sweet Alerts
- Data Tables
- Lockscreen Page
- Error Pages
- Under Construction Page
- User Profile
- Task Pages
- Invoice Pages
- Advanced Pricing Tables
- Easy to customize
- Google Fonts
- More Widgets
- Very Easy to Create your Own Site
- Neat, clean and simple design
- W3C Validated
Installation Process of composer
In order to run Symfony we need to install composer by the followingsteps
Steps to Download & Installation of Composer
Step1: Please visite the Official Web Site of the Composer https://getcomposer.org/
Step2: Click on the Download option
Step3: Click on the Composer-Setup.exe you are done with download
Step4: Now Right click on the Composer-Setup.exe file and select Run as administrator click on Yes
Step5: You'll be getting two options click as per your choice
Step6: I choose Recommended option here and if your developer you can check the box of the Developer Mode
Step7: And click on the Next button please make sure of installation path and then click Next
Step8: You'll be asked to enter proxy url please skip the step and click on the Next button
Step9: Please make sure with the PHP Version it should not be less than 7.3 V, here we used 8.0.9 Version and then click on the next button
Step10: To confirm that Composer is installed in your system then type Composer in command prompt (if you are using XAMPP then go to C:\xampp\htdocs location and type composer)
Installation Process of Symfony Stater Kit
Here we are using "Composer" to download "Symfony" packages
NOTE: This installation is shown based on XAMPP server..
1. Open command prompt, find the path of your XAMPP that is installed in your system.
2. Go to Example:C:\xampp\htdocs> path in
command prompt.
3. Now type the following command line composer create-project symfony/skeleton my_project
and hit enter to install the Symfony Packages in your "htdocs" folder.
4. Now your downloading is started please wait for sometime to download all the necessary packages
5. Open the command prompt, then usecd path-to-your-project. Run the commonds listed below.
6. Commands : composer require webapp, composer require symfony/asset and composer require symfony/webpack-encore-bundle.
7. Once you are redirected to the C:\xampp\htdocs> path then you are
sucessfully installed Symfony
If you have any further queries in installation please refer to the official website Click here
NOTE: After installation run the following command to get Symfony development server of your stater kit i.e., php -S 127.0.0.1:8000 -t public
How to Run Symfony Project in localhost
Step:1 Quick view of Installations
Download and Install the XAMPP from official site https://www.apachefriends.org/download.html
If you have installed XAMPP on your machine then please follow the below steps
Step:2 Run project
- First, Extract the project folder that you received from us.
- Go to your root project location path, then open the project file in your editor.
- Set the root path of your project in your editor's terminal.
- Now run the below commands to get the output of the project.
- Use
npm installto install node_modules. npm run buildto get the build assets of the project.- Finally, run the command:
php -S 127.0.0.1:8000 -t publicto get the Symfony development server. so that you can see the output of the project.
Note: Please run npm install and npm run build commands before you run the development server or project.
How to Use Symfony Web Pack
In order to use Symfony Mix you need to install Node.js in your system
Recommended LTS (long term support) version of Node.js.
Download latest version of node.js from nodejs.org
Install Node.js using .exe downloaded file.
To check your node version, run node -v in a terminal/console window (cmd)
Now you need to install Node Modules in your project folder1. Go to your project folder and there you will find a file called package.json.
2. Open the file in your editor and make sure that all the dependencies are correct as shown below
- "@hotwired/stimulus": "^3.0.0",
- "@symfony/stimulus-bridge": "^3.0.0",
- "@symfony/webpack-encore": "^1.7.0",
- "core-js": "^3.0.0",
- "regenerator-runtime": "^0.13.2",
- "webpack-notifier": "^1.6.0"
- "file-loader": "^6.2.0",
- "sass": "^1.50.0",
- "sass-loader": "^12.6.0"
3. And now set your project root path in terminal or command prompt Example: cd my-project and type the below command line.
npm install4. Wait until all the dependencies are downloaded to your project folder.
5. Now you can see the downloaded folder with the name of node_modules in your project folder.
6. Now in order to Compile Assets (webpack) first, you need to run development mode.
7. Set your project root path and type the below command line.
npm run dev8. Once the development mode starts you can customize your assets
9. After your project is set into Development Mode you need not to run the Development Mode, again and again, you can simply run the below command line to compile your assets continuously.
npm run watch10. Once you completed with the customization work you need to run your project in Production Mode in order to run Production Mode run the below command line
npm run buildVersion
- PHP : "^8.0.9",
- Composer : "^2.3.3",
- Symfony/Framework : "^6.0",
The Basic Structure Of Symfony Project
				├── assets
				├── bin
				├── config
				├── migrations
				├── public
				├── src
				├── templates
				├── translations
				├── var
				├── vendor
				├── .env
				├── .gitignore
				├── .htaccess
				├── composer.json
				├── composer.lock
				├── package.json
				├── package-lock.json
				├── symfony.lock
				└── webpack.config.js
Over All Folder Structure
						├── assets
						|   ├── Controllers
						|   ├── iconfonts
						|   ├── images
						|   ├── js
						|   ├── plugins
						|   ├── styles
						|   ├── switcherjs
						|   ├── app.js
						|   ├── bootstrap.js
						|   └── controller.json
						├── bin
						├── config
						├── migrations
						├── public
						├── src
						├── templates
						|   ├── 110+ Twig Pages
						|   ├── layouts
						|   |   ├── landing
						|   |   |   ├── footer.html.twig
						|   |   |   ├── header.html.twig
						|   |   |   ├── header1.html.twig
						|   |   |   ├── sidebar.html.twig
						|   |   |   ├── sidebar1.html.twig
						|   |   |   └── switcher.html.twig
						|   |   ├── app-header.html.twig
						|   |   ├── app-header1.html.twig
						|   |   ├── app-sidebar.html.twig
						|   |   ├── custom-scripts.html.twig
						|   |   ├── custom-styles.html.twig
						|   |   ├── custom-switcher.html.twig
						|   |   ├── footer.html.twig
						|   |   ├── modal.html.twig
						|   |   ├── scripts.html.twig
						|   |   ├── styles.html.twig
						|   |   ├── switcher-scripts.html.twig
						|   |   └── switcher.html.twig
						|   ├── base.html.twig
						|   ├── custom-base.html.twig
						|   ├── custom-base1.html.twig
						|   ├── landing-base.html.twig
						|   └── switcher-base.html.twig
						├── translations
						├── var
						├── vendor
						├── .env
						├── .gitignore
						├── composer.json
						├── composer.lock
						├── package.json
						├── package-lock.json
						├── symfony.lock
						└── webpack.config.js
SWITCHER?
If you want to add switcher to your template follow the below process.
How to add Switcher to the Template?
Go to root path:
templates/layouts/scripts.html.twig open
"scripts.html.twig" file and add switcher.js
link
given below.
			Add switcher js:

			<!-- INTERNAL SWITCHER JS -->
			{{ encore_entry_script_tags('switcher/switcher') }}
Go to root path:
templates/layouts/scripts.html.twig open
"scripts.html.twig" file and then change custom.js link
to
custom1.js link given below.
				change custom js link

				Before :
				<!-- CUSTOM JS -->
				{{ encore_entry_script_tags('js/custom') }}

				After :
				<!-- CUSTOM1 JS -->
				{{ encore_entry_script_tags('js/custom1') }}
NOTE: Custom1.js file is only used when you want to use switcher for your template.
Go to root path:
templates/base.html.twig open
"base.html.twig" file and then Replace app-header.html.twig to
app-header1.html.twig given below.
				Before :

				<!-- APP HEADER -->
				{{ include('layouts/app-header.html.twig') }}

				After :

				<!-- APP HEADER1-->
				{{ include('layouts/app-header1.html.twig') }}
Go to root
path: templates/base.html.twig open
base.html.twig in that file, below the
body tag switcher path given below.
Switcher path:
How to add switcher for Landing page?
Go to root
path: templates/landing-base.html.twig open
"landing-base.html.twig" file and then Replace header.html.twig to
header1.html.twig given below.
		change header.html.twig :

		Before :

		<!-- header.html.twig  -->
		{{ include('layouts/landing/header.html.twig') }}

		After :

		<!-- header1.html.twig -->
		{{ include('layouts/landing/header1.html.twig') }}
Go to root path:
templates/landing-base.html.twig open
"landing-base.html.twig" file and then Replace sidebar.html.twig to
sidebar1.html.twig given below.
		change sidebar.html.twig :

		Before :

		<!-- sidebar.html.twig  -->
		{{ include('layouts/landing/sidebar.html.twig') }}

		After :

		<!-- sidebar1.html.twig -->
		{{ include('layouts/landing/sidebar1.html.twig') }}
Go to root path:
templates/landing-base.html.twig open
"landing-base.html.twig" in that file, below the
body tag switcher path given below.
Switcher path:
NOTE:The switcher is different for custom pages, if you want to add switcher to the custom pages then follow the process.(Skip this process if this is not your requirement).
How to add switcher for custom pages?
Go to root
path: templates/layouts/custom-scripts.html.twig open
"custom-scripts.html.twig" file then add
switcher.js link given below.
		Add switcher js:

		<!-- SWITCHER JS -->
		{{ encore_entry_script_tags('switcher/switcher') }}
Go to root path:
templates/layouts/custom-scripts.html.twig open
"custom-scripts.html.twig" file then add
custom1.js link given below.
		change custom js link :

		Before :

		<!-- CUSTOM JS -->
		{{ encore_entry_script_tags('js/custom') }}

		After :

		<!-- CUSTOM1 JS -->
		{{ encore_entry_script_tags('js/custom1') }}
Go to root
path: templates/custom-base.html.twig open
"custom-base.html.twig" in that file, below the
"body tag" switcher icon code given below.
Go to root path
templates/custom-base.html.twig open
custom-base.html.twig in that file, below the
"body tag" switcher path given below.
NOTE: Please repeat the above switcher process for the remaing custom-base1 that are available in the path: templates/custom-base1
Chart color
NOTE: If you want to change your chart colors according to the theme colors, then follow the process.(Skip this process if this is not your requirement).
How to change colors of any chart according to the primary color of the template?
- Assume that you want to add chart in empty.php page then create an empty.js file, which is used for that particular page only.
- Place your chart data in the empty.js file in a particular function related to that chart. If you are using more than one chart in empty.php page, then please create a new function() and a new id (here id is nothing but a name that you used for your particular chart. function() name and ID name must be unique for every chart).
- Here i created a new function with name
(myChart())for my new chart in empty.php page
		for chart 1:	function myChart1() {

				----chart1 data----
				#chartId1

						}

		for chart 2:	function myChart2() {

				----chart2 data----
				#chartId2
							}
How to apply colors to the new chart?
Open themecolor.js (root path: assets/js/themecolor.js)
and paste the below code inside of the function names() function of
(// chart colors) section.
	export function names() {

		Ex:
			if(document.querySelector('#chartId1') !== null){
				myChart1();
			}

			if(document.querySelector('#chartId2') !== null){
				myChart2();
			}
- Here (#chartId1) is nothing but, the id that you used for your particular chart.
- Here myChart1(); is nothing but a function that you used for your particular chart.
- Open empty.js file and add( myVarVal ) variable in a place, where you want to change the colors of your chart according to the primary color of the template.
- NOTE: For more understanding please refer below code which we used in index1.js file present in root path: "assets/js/index1.js".
- Here myVarVal is nothing but a variable name, if you use this variable anywhere then the color of that particular place will change according to theme color
colors: [ myVarVal || "#38cab3","#e4e7ed"],
FAQ'S
1) How to Change Font Style ?
Step 1:
Go To _fonts.scss (assets/styles/scss/custom/fonts/_fonts.scss )
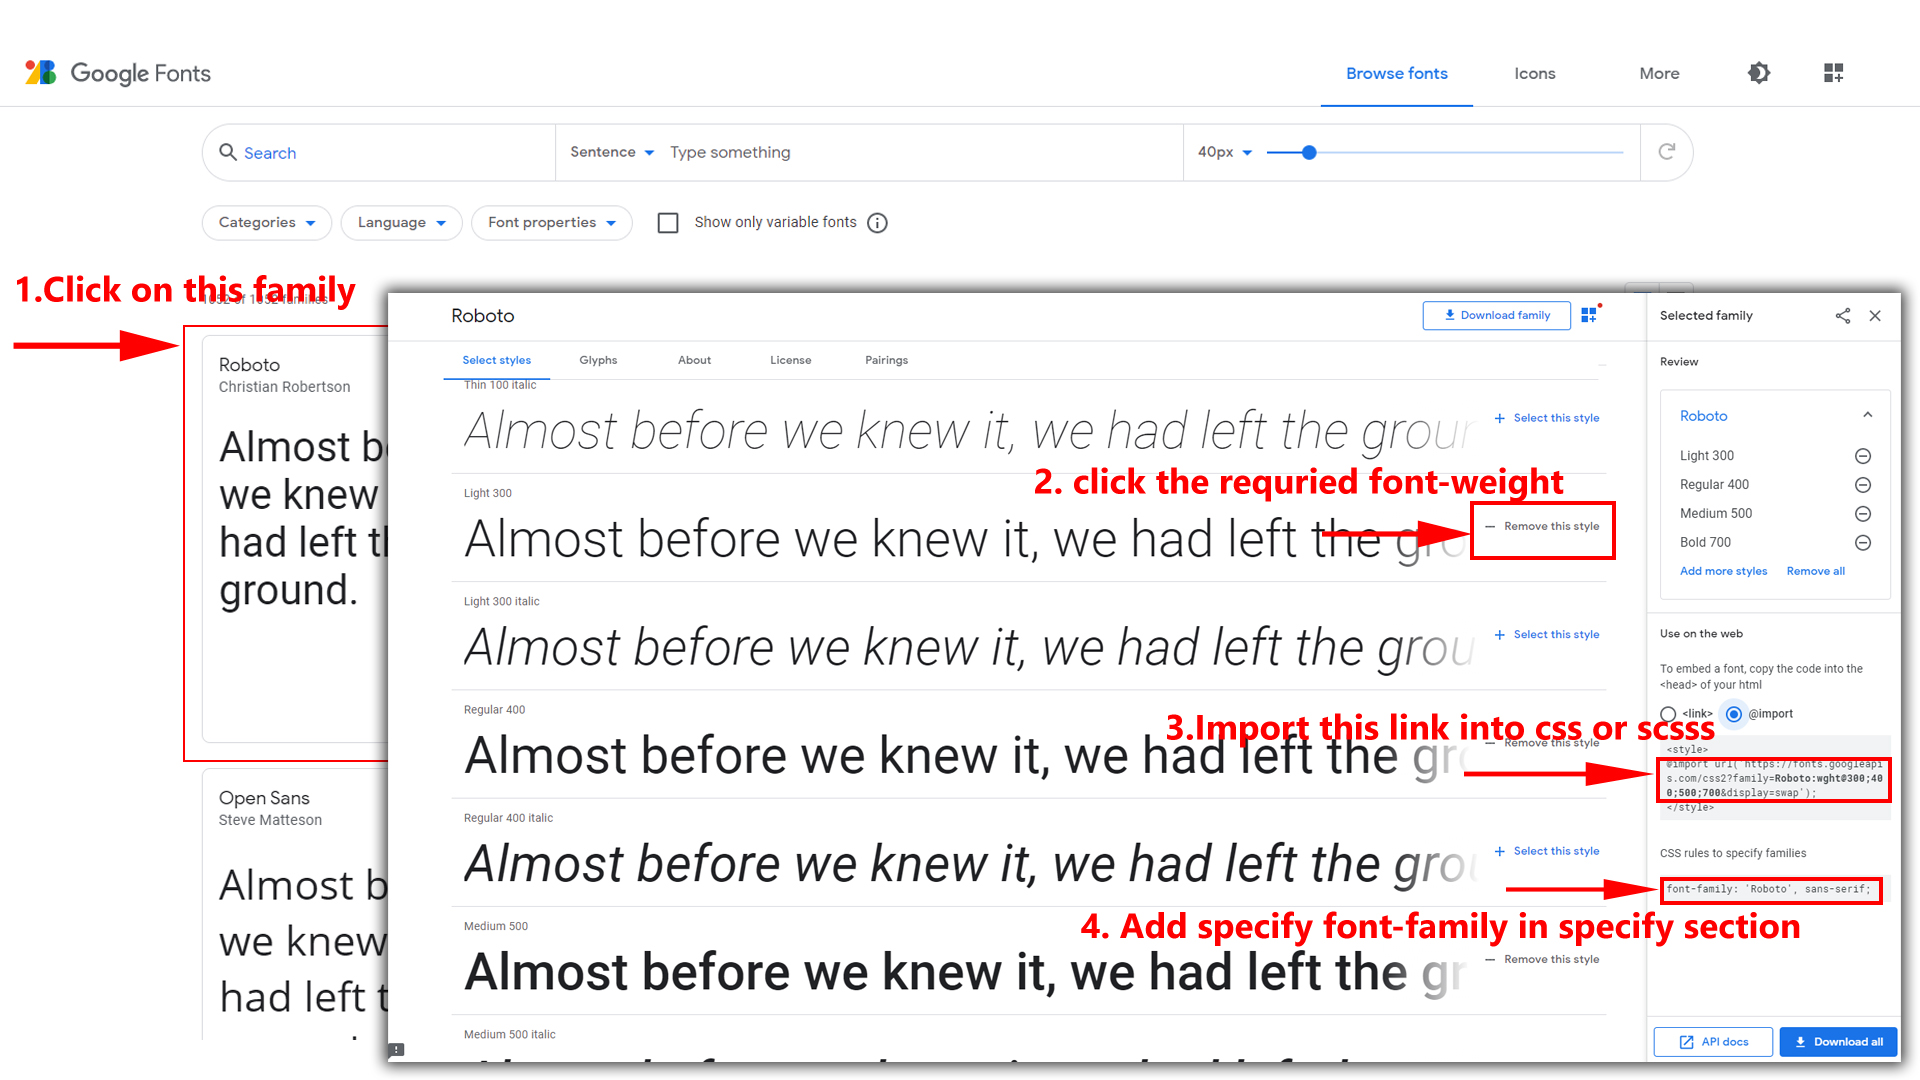
if you want to change another font-family Go to the site Google Fonts And Slect One font Family and import In to style.css file
How to Select font Family
Example:
Step 2:
And paste Your Selected font-family in _fonts.scss
Example:
@import url("https://fonts.googleapis.com/css?family=Roboto:300,400,500,700,900");
Step 3:
And add the Your Selected font-family in _bootstrap-styles.scss(assets/styles/scss/bootstrap/_bootstrap-styles.scss)
Example:
													body {
														margin: 0;
														font-family: "Roboto", sans-serif;
														font-size: 0.8375rem;
														font-weight: 400;
														line-height: 1.5;
														color: $default-color;
														text-align: left;
														background-color: $background;
													}
npm run dev command after changing or modifying the content in assets folder, otherwise those changes you've made will not be applied to your template.
2) How to Change Sidemenu and Header icon?
NOTE :Sidemenu & Header Icons used in Noa are
fromhttps://iconscout.com/unicons
(Thin Line Icons).
Changing Sidemenu Icon :
You can change sidemenu icon by replacing svg code of selected icon with
svg code of required icon and add class="side-menu__icon"
for that svg icon
Changing Header Icon :
You can change Header icon by simply replacing svg code of selected icon with svg code of required icon.
3) How to Change Primary Color ?
Step 1:
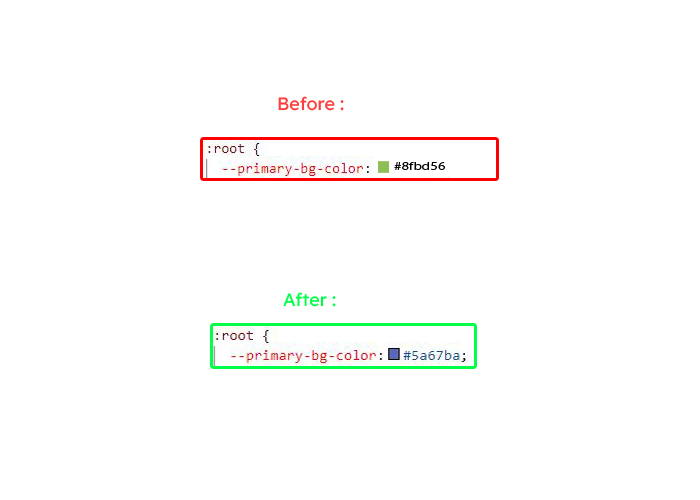
Go To _bootstrap-styles.scss (assets/styles/scss/bootstrap/_bootstrap-styles.scss )
You will find --primary-bg-color: #8FBD56; , where you can
simply change color code to change primary color
How to Change Primary Color
Example:
Simply you can also change color for
primary-bg-hover:#5cd3b9; &
--primary-bg-border:#38cab3; , where you can simply change
color code to change them
npm run dev command after changing or modifying the content in assets folder, otherwise those changes you've made will not be applied to your template.
4) How to Change Logo ?
Go To "assets/images/brand" folder and replace your logo with Previous Logos within in image size. note: Please don't increase logo sizes. Replace your logo within given image size. otherwise the logo will not fit in particular place it disturbs the template design.
5) How to Enable RTL version?
Changing to RTL version
open custom.js
path:(assets/js/custom.js) file go to RTL
Style. and remove comments for
$('body').addClass('rtl'); to enable RTL version as
shown in below
// $('body').addClass('rtl');
$('body').addClass('rtl') as shown below
$('body').addClass('rtl');
npm run dev command after changing or modifying the content in assets folder, otherwise those changes you've made will not be applied to your template.
6) How to Enable Darktheme?
open custom.js path:(assets/js/custom.js)
file go to Dark Theme Style and remove comments for
$('body').addClass('dark-mode'); to enable dark-mode style
as shown in below
													// DARK THEME START
														// $('body').addClass('dark-mode');
													// DARK THEME END
dark-mode as
shown below
													// DARK THEME START
														$('body').addClass('dark-mode');
													// DARK THEME END
npm run dev command after changing or modifying the content in assets folder, otherwise those changes you've made will not be applied to your template.
7) How to change Dark Background color?
Step 1:
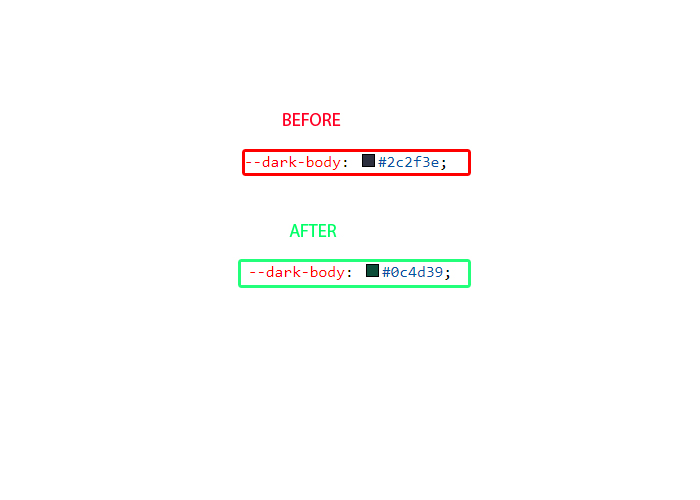
Go To _bootstrap-styles.scss (assets/styles/scss/bootstrap/_bootstrap-styles.scss )
You will find --dark-body: #2c2f3e; , where you can simply
change color code to change dark background color
How to change Dark Background Color
Example:
npm run dev command after changing or modifying the content in assets folder, otherwise those changes you've made will not be applied to your template.
8) How to Enable Background image?
open custom.js path:(assets/js/custom.js)
file go to Background Image Styles and remove comments for
bg-img1 & dark-mode to enablebackground image
style as shown in below
													// Bg-Image1 Style Start
														// $('body').addClass('bg-img1');
														// $('body').addClass('dark-mode');
													// ! Bg-Image1 Style End
bg-img1 & transparent-theme as shown below
													// Bg-Image1 Style Start
														$('body').addClass('bg-img1');
														$('body').addClass('dark-mode');
													// ! Bg-Image1 Style End
NOTE: Similarly you can apply bg-img2,bg-img3,bg-img4
NOTE: We can't use menu styles and header styles in Background Image
Go To "assets/images/media" folder and replace your image with Previous image(bg-img1) within image size. note: Please don't increase image size. Replace your image within given image size. otherwise the image will not fit in particular place it disturbs the template design.
NOTE: You must performnpm run dev command after changing or modifying the content in assets folder, otherwise those changes you've made will not be applied to your template.
9) How to Enable Color-header?
open custom.js path:(assets/js/custom.js)
file go to Header Styles. and remove comments for
color-header to enable color-header style as shown in below
													// COLOR HEADER START
														// $('body').addClass('color-header');
													// COLOR HEADER END
color-header
as shown below
													// COLOR HEADER START
														$('body').addClass('color-header');
													// COLOR HEADER END
npm run dev command after changing or modifying the content in assets folder, otherwise those changes you've made will not be applied to your template.
10) How to Enable Dark-header?
open custom.js path:(assets/js/custom.js)
file go to Header Styles. and remove comments for
dark-header to enable dark-header style as shown in below
													// DARK HEADER START
														// $('body').addClass('dark-header');
													// DARK HEADER END
dark-header as
shown below
													// DARK HEADER START
														$('body').addClass('dark-header');
													// DARK HEADER END
npm run dev command after changing or modifying the content in assets folder, otherwise those changes you've made will not be applied to your template.
11) How to Enable Light-header?
open custom.js path:(assets/js/custom.js)
file go to Header Styles. and remove comments for
header-light to enable light-header style as shown in below
													// LIGHT HEADER START
														// $('body').addClass('header-light');
													// LIGHT HEADER END
header-light
as shown below
													// LIGHT HEADER START
													$('body').addClass('header-light');
													// LIGHT HEADER END
npm run dev command after changing or modifying the content in assets folder, otherwise those changes you've made will not be applied to your template.
12) How to Enable Gradient-header?
open custom.js path:(assets/js/custom.js)
file go to Header Styles. and remove comments for
gradient-header to enable gradient-header style as shown in
below
													// GRADIENT HEADER START
														// $('body').addClass('gradient-header');
													// GRADIENT HEADER END
gradient-header as shown below
													// GRADIENT HEADER START
														$('body').addClass('gradient-header');
													// GRADIENT HEADER END
npm run dev command after changing or modifying the content in assets folder, otherwise those changes you've made will not be applied to your template.
13) How to Enable Light Menu?
open custom.js path:(assets/js/custom.js)
file go to Menu Styles. and remove comments for light-menu
to enable light-menu style as shown in below
													// LIGHT LEFTMENU START
														// $('body').addClass('light-menu');
													// LIGHT LEFTMENU END
light-menu as
shown below
													// LIGHT LEFTMENU START
														$('body').addClass('light-menu');
													// LIGHT LEFTMENU END
npm run dev command after changing or modifying the content in assets folder, otherwise those changes you've made will not be applied to your template.
14) How to Enable Color Menu?
open custom.js path:(assets/js/custom.js)
file go to Menu Styles. and remove comments for color-menu
to enable color-menu style as shown in below
													// COLOR LEFTMENU START
														// $('body').addClass('color-menu');
													// COLOR LEFTMENU END
color-menu as
shown below
													// COLOR LEFTMENU START
														$('body').addClass('color-menu');
													// COLOR LEFTMENU END
npm run dev command after changing or modifying the content in assets folder, otherwise those changes you've made will not be applied to your template.
15) How to Enable Dark Menu?
open custom.js
path:(assets/js/custom.js)file go to Menu Styles.
and remove comments for dark-menu to enable dark-menu style
as shown in below
													// DARK LEFTMENU START
														// $('body').addClass('dark-menu');
													// DARK LEFTMENU END
dark-menu as
shown below
													// DARK LEFTMENU START
														$('body').addClass('dark-menu');
													// DARK LEFTMENU END
npm run dev command after changing or modifying the content in assets folder, otherwise those changes you've made will not be applied to your template.
16) How to Enable Gradient Menu?
open custom.js
path:(assets/js/custom.js)file go to Menu Styles.
and remove comments for gradient-menu to enable
gradient-menu style as shown in below
													// GRADIENT LEFTMENU START
														// $('body').addClass('gradient-menu');
													// GRADIENT LEFTMENU END
gradient-menu
as shown below
													// GRADIENT LEFTMENU START
														$('body').addClass('gradient-menu');
													// GRADIENT LEFTMENU END
npm run dev command after changing or modifying the content in assets folder, otherwise those changes you've made will not be applied to your template.
17) How to Enable Boxed-Layout?
open custom.js
path:(assets/js/custom.js)file go to Layout
Styles. and remove comments for layout-boxed to enable
layout-boxed style as shown in below
													// BOXED LAYOUT START
														// $('body').addClass('layout-boxed');
													// BOXED LAYOUT END
layout-boxed
as shown below
													// BOXED LAYOUT START
														$('body').addClass('layout-boxed');
													// BOXED LAYOUT END
npm run dev command after changing or modifying the content in assets folder, otherwise those changes you've made will not be applied to your template.
18) How to Enable Scrollable-Layout?
open custom.js path:(assets/js/custom.js)
file go to HEADER POSITION STYLES START. and remove comments for
scrollable-layout to enable scrollable-layout style as
shown in below
													// HEADER POSITION STYLES START
														// $('body').addClass('scrollable-layout');
													// HEADER POSITION STYLES END
scrollable-layout as shown below
													// HEADER POSITION STYLES START
														$('body').addClass('scrollable-layout');
													// HEADER POSITION STYLES END
npm run dev command after changing or modifying the content in assets folder, otherwise those changes you've made will not be applied to your template.
19) How to Enable Sidemenu-Icon-with Text?
open custom.js path:(assets/js/custom.js)
file and remove comments for ICONTEXT SIDEMENU START to
enable sidemenu-icontext style as shown in below
													// ICONTEXT SIDEMENU START
													// $('body').addClass('icontext-menu');
													// $('body').addClass('sidenav-toggled');
													// if((document.querySelector('body').classList.contains('login-img')) ){
													//     return;
													// }
													// else if((document.querySelector('body').classList.contains('error-bg'))){
													//     return;
													// }
													// else{
													//     icontext();
													// }
													// ICONTEXT SIDEMENU END
sidemenu-icontext as shown below
													// ICONTEXT SIDEMENU START
														$('body').addClass('icontext-menu');
														$('body').addClass('sidenav-toggled');
														if((document.querySelector('body').classList.contains('login-img')) ){
															return;
														}
														else if((document.querySelector('body').classList.contains('error-bg'))){
															return;
														}
														else{
															icontext();
														}
													// ICONTEXT SIDEMENU END
npm run dev command after changing or modifying the content in assets folder, otherwise those changes you've made will not be applied to your template.
20) How to Enable Closed-Menu?
open custom.js path:(assets/js/custom.js)
file and remove comments for CLOSED SIDEMENU START to
enable closed menu style as shown in below
													// CLOSED SIDEMENU START
														// $('body').addClass('closed-leftmenu');
														// $('body').addClass('sidenav-toggled');
													// CLOSED SIDEMENU END
Closed Sidemenu as shown below
													// CLOSED SIDEMENU START
														$('body').addClass('closed-leftmenu');
														$('body').addClass('sidenav-toggled');
													// CLOSED SIDEMENU END
npm run dev command after changing or modifying the content in assets folder, otherwise those changes you've made will not be applied to your template.
21) How to Enable Icon Overlay
open custom.js path:(assets/js/custom.js)
file and remove comments for ICON OVERLAY SIDEMENU START to
enable Icon Overlay style as shown in below
													// ICON OVERLAY SIDEMENU START
													// $('body').addClass('icon-overlay');
													// $('body').addClass('sidenav-toggled');
													// if((document.querySelector('body').classList.contains('login-img')) ){
													//     return;
													// }
													// else if((document.querySelector('body').classList.contains('error-bg'))){
													//     return;
													// }
													// else{
													//     hovermenu();
													// }
													// ICON OVERLAY SIDEMENU END
sideicon-menu
as shown below
													// ICON OVERLAY SIDEMENU START
														$('body').addClass('icon-overlay');
														$('body').addClass('sidenav-toggled');
														if((document.querySelector('body').classList.contains('login-img')) ){
															return;
														}
														else if((document.querySelector('body').classList.contains('error-bg'))){
															return;
														}
														else{
															hovermenu();
														}
													// ICON OVERLAY SIDEMENU END
npm run dev command after changing or modifying the content in assets folder, otherwise those changes you've made will not be applied to your template.
22) How to Enable Hover Submenu
open custom.js path:(assets/js/custom.js)
file and remove comments for HOVER SUBMENU START to enable
Hover submenu style as shown in below
													// HOVER SUBMENU START
													// $('body').addClass('hover-submenu');
													// $('body').addClass('sidenav-toggled');
													// if((document.querySelector('body').classList.contains('login-img')) ){
													//     return;
													// }
													// else if((document.querySelector('body').classList.contains('error-bg'))){
													//     return;
													// }
													// else{
													//     hovermenu();
													// }
													// HOVER SUBMENU END
Hover Submenu
as shown below
													// HOVER SUBMENU START
														$('body').addClass('hover-submenu');
														$('body').addClass('sidenav-toggled');
														if((document.querySelector('body').classList.contains('login-img')) ){
															return;
														}
														else if((document.querySelector('body').classList.contains('error-bg'))){
															return;
														}
														else{
															hovermenu();
														}
													// HOVER SUBMENU END
npm run dev command after changing or modifying the content in assets folder, otherwise those changes you've made will not be applied to your template.
23) How to Enable Hover Submenu style1
open custom.js path:(assets/js/custom.js)
file and remove comments for HOVER SUBMENU STYLE-1 START to
enable Hover submenu style1 style as shown in below
													// HOVER SUBMENU STYLE-1 START
													// $('body').addClass('hover-submenu1');
													// $('body').addClass('sidenav-toggled');
													// if((document.querySelector('body').classList.contains('login-img')) ){
													//     return;
													// }
													// else if((document.querySelector('body').classList.contains('error-bg'))){
													//     return;
													// }
													// else{
													//     hovermenu();
													// }
													// HOVER SUBMENU STYLE-1 END
Hover Submenu Style1 as shown below
													// HOVER SUBMENU STYLE-1 START
														$('body').addClass('hover-submenu1');
														$('body').addClass('sidenav-toggled');
														if((document.querySelector('body').classList.contains('login-img')) ){
															return;
														}
														else if((document.querySelector('body').classList.contains('error-bg'))){
															return;
														}
														else{
															hovermenu();
														}
													// HOVER SUBMENU STYLE-1 END
npm run dev command after changing or modifying the content in assets folder, otherwise those changes you've made will not be applied to your template.
24) How to Enable Horizontal layout
open custom.js path:(assets/js/custom.js)
file and remove comments for horizontal to enable
Horizontal layout style as shown in below
// $('body').addClass('horizontal');
Horizontal layout as shown below
$('body').addClass('horizontal');
npm run dev command after changing or modifying the content in assets folder, otherwise those changes you've made will not be applied to your template.
25) How to Enable Horizontal Hover layout
open custom.js path:(assets/js/custom.js)
file and remove comments for horizontal-hover to enable
Horizontal Hover layout style as shown in below
// $('body').addClass('horizontal-hover');
Horizontal Hover layout as shown below
$('body').addClass('horizontal-hover');
npm run dev command after changing or modifying the content in assets folder, otherwise those changes you've made will not be applied to your template.
26) How to Enable Horizontal or Horizantal Hover layout With Wrap Style
open custom.js Example: Simply you can change path:(assets/js/custom.js)
file nowrap is enabled by default,If you want wrap style uncomment wrap
style code and comment nowrap style as shown below.
													// To enable no-wrap horizontal style
													$('#slide-left').removeClass('d-none');
													$('#slide-right').removeClass('d-none');
													document.querySelector('.horizontal .side-menu').style.flexWrap = 'nowrap'
													// To enable wrap horizontal style
													// $('#slide-left').addClass('d-none');
													// $('#slide-right').addClass('d-none');
													// document.querySelector('.horizontal .side-menu').style.flexWrap = 'wrap'
														// To enable no-wrap horizontal style
														// $('#slide-left').removeClass('d-none');
														// $('#slide-right').removeClass('d-none');
														document.querySelector('.horizontal .side-menu').style.flexWrap = 'nowrap'
														// To enable wrap horizontal style
														$('#slide-left').addClass('d-none');
														$('#slide-right').addClass('d-none');
														// document.querySelector('.horizontal .side-menu').style.flexWrap = 'wrap'
Below Image Shows How Wrap and Nowrap Styles Looks like.

noWrap with wrapto
change the style of Horizontal or Horizontal Hover Menus npm run dev command after changing or modifying the content in assets folder, otherwise those changes you've made will not be applied to your template.
To clear LocalStorage(cookie)
How to clear LocalStorage (cookie)?
Step1:
Open themeColors.js file assets/js/themeColors.js
To clear LocalStorage loading functions you need to remove localStorageBackup() function in themeColors.js as shown below
function localStorageBackup() {


}
Step2:
To remove complete LocalStorage saving you need to remove all localstorage related calling functions in themeColors.js assets/js/themeColors.js , custom.js assets/js/custom.js and custom1.js assets/js/custom1.js files.
LocalStorage related functions like localStorage.setItem, localStorage.removeItem, localStorage.getItem, localStorage.clear and localStorageBackup(). Below are the some examples to find out.
	localStorage.setItem('noalightMode', true);
	localStorage.removeItem('noadarkPrimary')
	localStorage.getItem("noaprimaryColor");
	localStorageBackup();
npm run dev command after changing or modifying the content in assets folder, otherwise those changes you've made will not be applied to your template.
Landing Page FAQ's
1) How to Enable LANDING Page RTL Version?
Changing to RTL Version
open custom.js
path:(assets/js/landing.js) file go to RTL
Style. and remove comments for
$('body').addClass('rtl'); to enable RTL version as
shown in below
// $('body').addClass('rtl');
$('body').addClass('rtl') as shown below
$('body').addClass('rtl');
npm run dev command after changing or modifying the content in assets folder, otherwise those changes you've made will not be applied to your template.
2) How to Enable LANDING Page Darktheme?
open landing.js path:(assets/js/landing.js)
file go to Dark Theme Style and remove comments for
$("body").addClass("dark-mode"); to enable dark-mode style
as shown in below
													// DARK THEME START
														// $('body').addClass('dark-mode');
													// DARK THEME END
dark-mode as
shown below
													// DARK THEME START
														$('body').addClass('dark-mode');
													// DARK THEME END
npm run dev command after changing or modifying the content in assets folder, otherwise those changes you've made will not be applied to your template.
Sources
- Bootstrap
- https://getbootstrap.com/
- Jquery
- https://jquery.com/
- Jquery Datepicker
- https://jqueryui.com/datepicker/
- Jquery Timepicker
- https://jonthornton.github.io/jquery-timepicker/
- Perfect-scrollbar
- https://github.com/mdbootstrap/perfect-scrollbar
- Full Calendar
- https://fullcalendar.io/
- File Uploads
- https://www.jqueryscript.net/demo/jQuery-Plugin-To-Beautify-File-Inputs-with-Custom-Styles-Dropify/
- Select2
- https://select2.org/
- Datatable
- https://datatables.net/
- Font Awesome Icons
- https://fontawesome.com/
- Material Design Icons
- https://materialdesignicons.com/
- Simpleline Icons
- https://iconify.design/icon-sets/simple-line-icons/
- Ionicons
- https://ionicons.com/
- ion.rangeSlider
- http://ionden.com/a/plugins/ion.rangeSlider/index.html
- jquery-countdown
- http://keith-wood.name/countdown.html
- jquery-inputmask
- https://robinherbots.github.io/Inputmask/
- jquery-sparkline
- https://omnipotent.net/jquery.sparkline/#s-about
- jQuery StarRatingSvg
- http://github.com/nashio/star-rating-svg
- Sweet-alert
- https://lipis.github.io/bootstrap-sweetalert/
- Sparkline Charts
- https://omnipotent.net/jquery.sparkline/#s-about
- Chartjs
- https://www.chartjs.org/
- Flotcharts
- https://www.flotcharts.org/plugins/
- Echarts
- https://echarts.apache.org/en/index.html
- Morris Chart
- https://morrisjs.github.io/morris.js/
- Wysiwyag
- https://www.jqueryscript.net/demo/Rich-Text-Editor-jQuery-RichText/
- Summernote Editor
- https://summernote.org/
Font Used
Google fonts are used in the template. They are as follows: Google Fonts
All Images are used: Pexels.com