Zanex – Django Admin & Dashboard Template
Introduction
Welcome to Zanex – Django Admin & Dashboard Template
Zanex is a responsive HTML based Django template, With this template format,
it's very easy to
create
a presence and grab someone's attention around the web page
because the template is built using HTML5, CSS3, Bootstrap 5 framework and with
Sass.
So
please before you start working with the template take a quick look on the
documentation.
So that you can easily built your website.
If you love ❤️ our template design Please don't forget to rate it. Thank you so much! 😊
Dashboard
Welcome to Zanex – Django Admin & Dashboard Template
- Created Date: 02/09/2021
- Author: SPRUKO™
- Company: Spruko Technologies Private Limited
- Support: support@spruko.com
Thank you for purchasing our admin template. Feel free to contact us any time. We have a best dedicated team to provide you the best support. If you have any queries please contact us through live chat or email:- sprukotechnologies@gmail.com
Template Description
Zanex – Django Admin & Dashboard template. It includes 100+ Django html Pages, 50+ Plugins, UI elements and different Styles of Widgets etc. This template is “User Friendly” and it is designed in such a way that you can easily understand the code and can modify the template. The template contains advanced Form-Elements like Date pickers, Select2, Multi Select etc. This template is 100% Premium Admin Templates. This template is designed using Bootstrap 5 framework, HTML5, CSS3, Jquery.
It has clean, flat user interface design, easily customizable components and widgets. The Template comes with an unique design also we ensure you that you can easily design your admin template.
It’s fully responsive layout for all types of devices. It work’s on all major web browsers, Desktop, iPhone, iPad, Tablet and all other smart devices.
Once you Purchase the Zanex – Django Admin & Dashboard template you’ll be getting all the HTML5, CSS3, Scss & JS files and you are enabled to get free downloads of all the future updates.
Main Features
- 100+ Django HTML Pages
- Bootstrap 5 Responsive Framework
- Well Commented Code
- 24 * 7 Professional Company Support
- Regular Updates
- 50+ Plugins
- 9 types of Charts
- Select2
- Mail Inbox
- 10 Types of Icons
- File upload
- Message Chat
- Form Elements
- Form Editor
- Form Wizard
- Sweet Alerts
- Data Tables
- Lockscreen Page
- Error Page
- Under Construction Page
- User Profile
- Easy to customize
- More Widgets
- Invoice Page
- Pricing Tables
- Very Easy to Create your Own Site
- Neat, clean and simple design
- W3C Validated
Minimum Requirements
- Python >= 3.9.6
- asgiref >=3.4.1
- pytz >=2021.1
- sqlparse >=0.4.1
- pip >= 21.1.3
- Django >= 3.2.5
- Django-htmlmin >= 0.11.0
Installation Process of Python
In order to run Django we need to install Python by the following steps
This steps are based on Windows OS
Step1: Please visite the Official Web Site of the Python python.org
Step2: Click on the Download Python button
Step3: Now your Python setup file has downloaded
Step4: Now Right click on the Python setup file and select Run as administrator click on Yes
Step5: Please check on the Check Box Add Python to PATH. And select Customize installation option
Step6: Click on Install for all users. And click on the Install button to install python on your system
Step7: To check whether Python is installed or not type python --version in your terminal or console
Step8: The pip package is automatically installed with your python installation
Step9: To check whether pip package is installed or not type pip --version in your terminal or console
Note: Please follow the official web site python.org to install on Linux/UNIX OS.
INSTALLATION PROCESS OF Django
Here we are using "Python Manager" to download "Django"
If you know how to create Django project you can skip this step.
- First open command prompt in my case Example:
C:\Users\ADMIN01>and typepip install djangoto install Django globally. - To check whether Django is installed or not type
python -m django --versionin your terminal or console - Now open a new command prompt and navigate to the folder where you want to create the Django project.
- In my case Example:
C:\Users\ADMIN01\Desktop\django>. - Now type the following command line
django-admin startproject projectnameand hit enter to create Django project. Here projectname is nothing but your django project folder name that you want to keep as your project name - Now you are sucessfully created Django project.
- To create App or Application navigate to your django project folder Example:
C:\Users\ADMIN01\Desktop\django\projectname\myproject>in your command prompt and typepython manage.py startapp appname - Now you are sucessfully created App in your django project.
- We have an improtant dependency or modual called django-htmlmin it is used to minify the html content to download this modul please type below command in your terminal.
Note: If you have any further queries in installation please refer to the official websites Click here
After installation run following command to get Django development server
python manage.py runserverSET-UP DJANGO PROJECT
- Assuming that you have already installed python on your computer.
- First, install Virtualenv on your computer globally or locally by setting your project path in the terminal.
- To install Virtualenv type
python -m venv env - Now you need to activate your Virtualenv by typing
env\scripts\activate - The project that you received will have a file called the requirements.txt file. Now set your root path till that file in your terminal and type
pip install -r requirements.txt - The above command will download all the required packages by using the requirements.txt file.
- Once the download is completed set the project root path in the terminal and type
python manage.py runserverto start the project.
How to convert Verticalmenu Layout to Horizontalmenu Layout
Check out the folder structure of the Layout Versions
											├── ltr/
											|   ├── __pycache__
											|   ├── migrations
											|   ├── templates/
											|   |   ├── components
											|   |   |   ├── layouts
											|   |   |   ├── versions
											|   |   |   ├── base.html
											|   |   |   └── custom-base.html
											|   |   └── ltr
											|   |       └── .html files (100+)
											|   ├── __init__.py
											|   ├── admin.py
											|   ├── apps.py
											|   ├── models.py
											|   ├── tests.py
											|   ├── urls.py
											|   └── views.py
											├── rtl/
											|   ├── __pycache__
											|   ├── migrations
											|   ├── templates/
											|   |   ├── components-rtl
											|   |   |   ├── layouts
											|   |   |   ├── versions
											|   |   |   ├── base.html
											|   |   |   └── custom-base.html
											|   |   └── rtl
											|   |       └── .html files (100+)
											|   ├── __init__.py
											|   ├── admin.py
											|   ├── apps.py
											|   ├── models.py
											|   ├── tests.py
											|   ├── urls.py
											|   └── views.py
											├── static/
											|   └── assets
Steps to convert Verticalmenu to Horizontalmenu
- First, unzip the project folder that you received from us.
- Navigate as shown Example: F:\project folder\ltr\templates\components
- Open components there you will find base.html and custom-base.html files
- Here base.html file is the main base file to activate all versions step by step
- And custom-base.html file is the main base file to activate all custom pages
- By default vertical menu is activated as shown in the below image
{% extends 'components/versions/vertical/light.html' %} 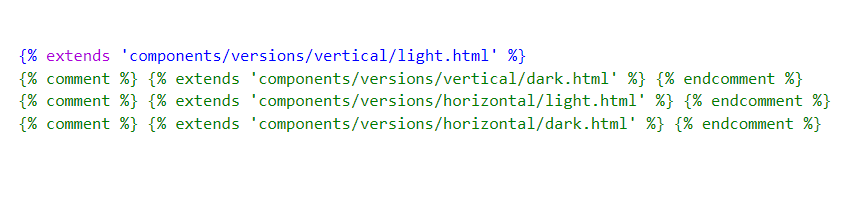
- If you want to activate another version for example horizontal menu open base.html file in your editor and you need to uncomment the code and give the top priority i.e place the code at the top row as shown in the below image.
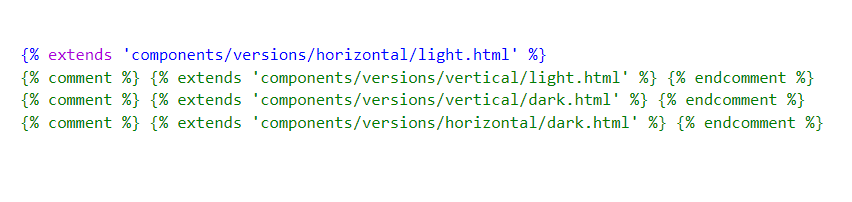
- Change this code
{% extends 'components/versions/vertical/light.html' %}to this{% extends 'components/versions/horizontal/light.html' %} - Repate the same process for custom pages as shown in the below image
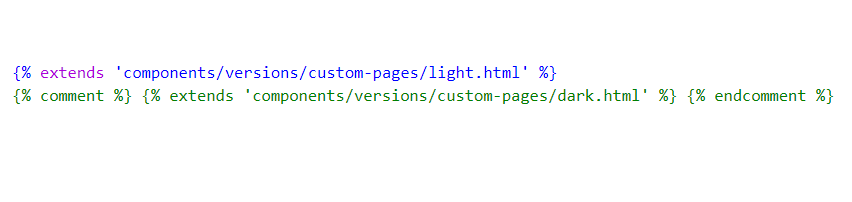
- When you are converting light version to dark version it is necessary to do the same for custom pages, otherwise custom pages will not convert to dark-mode
- Now set your project path in command prompt or terminal and type
python manage.py runserver - Now you have sucessfully activated to Horizontalmenu
- Please refer FAQ'S to activate other versions and styles like Boxed-Layout, Sidemenu-Icon-with Text & Sidemenu-Icon.
- Simillarly repeat the above process for rtl
Note : The activated version code should be at the top priority, that is at the top row as shown in the above images.
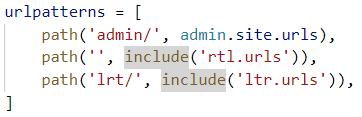
LTR TO RTL
- You can convert your project from LTR to RTL in just on step by changing url.
- Navigate to main django folder there you will find urls.py file by default LTR url is given.
- If you want to change to RTL open that urls.py file in your editor and change the url as shown in the below image.
SCSS & CSS
Zanex comes with power of SCSS. The css files can be generated from scss by simply following below steps:
- Gulp
Gulp is a JavaScipt streaming task runner. It automate many development tasks. Using gulp you can perform tasks like running a local server, minifying code, compilation, Browser sync ,optimizing images, etc... We are using gulp which allows easy compilation of scss to csss. You can read it more about it here.
Prerequisites
Please follow below steps to install and setup all prerequisites:
- Nodejs
Make sure to have the Node.js installed & running in your computer. If you already have installed nodejs on your computer, you can skip this step, otherwise install nodejs on your computer,
Use
npm install init -ycommand to generate packages.json file - Gulp
Make sure to have the Gulp installed & running in your computer. If you already have installed gulp on your computer, you can skip this step. In order to install, just run command
npm install -g gulpfrom your terminal. After Completion of gulp Install. open
gulpfile.jsAnd install the "Declartion of gulp variables" in your command promt. In order to install, just run commandnpm install gulp,npm install gulp-sass,
npm install gulp-postcss,npm install autoprefixer,npm install gulp-sourcemaps,
npm install browser-sync,
npm install gulp-cssbeautify,
npm install gulp-beautifyfrom your terminal.Make sure to have all above prerequisites installed & running in your computer. If you want install more variables for your template, just declare the variables in
gulpfile.jsafter that run in command promt
Installation
To setup, follow below mentioned steps:
- Install Prerequisites
Make sure to have all above prerequisites installed & running in your computer
- Install Dependencies
Open your terminal, go to your folder and enter the command
npm install. This would install all required dependencies innode_modulesfolder.
After you finished with above steps, you can run the command to compile scss into css:
gulp
SCSS & CSS
Here we provided the packages.json and gulpfile.js files in your project you just need to run npm install in your terminal at your project root path.
After compilation of download, you can compile your SCSS & CSS files by following the below procedure.
| Command | Description |
|---|---|
gulp
|
Runs the project locally, starts the development server and watches for any changes in your code, including your html, javascript, sass, etc. The development server is accessible at http://localhost:3000. |
gulp watch
|
In this template gulp watch command is for what ever changes made in scss folder, will watch and run an appropriate task.
All the CSS files under assets/css/ folder will be watched and upon changes made to these files, the styles task will be executed.
|
gulp dark
|
In this template gulp dark command is for what ever changes that are made in style-dark.scss will be watched and the changes automatically updated in style-dark.css file in css folder.
|
gulp sidemenu
|
In this template gulp sidemenu command is for what ever changes are made in sidemenu.scss will be watched and the changes automatically updated in sidemenu.css file in css folder.
|
gulp skin
|
In this template gulp skin command is for what ever changes are made in skin-modes.scss will be watched and the changes automatically updated in skin-modes.css file in css folder.
|
gulp color
|
In this template gulp color command is for what ever changes are made in colors folder will be watched and the changes automatically updated in color.css file in css folder.
|
gulp icontext
|
In this template gulp icontext command is for what ever changes are made in sidemenu-icontext.scss will be watched and the changes automatically updated in sidemenu-icontext.css file in css folder.
|
gulp icon
|
In this template gulp icon command is for what ever changes are made in sidemenu-icon.scss will be watched and the changes automatically updated in sidemenu-icon.css file in css folder.
|
SCSS-rtl & CSS-rtl
| Command | Description |
|---|---|
gulp
|
Runs the project locally, starts the development server and watches for any changes in your code, including your html, javascript, sass, etc. The development server is accessible at http://localhost:3000. |
gulp watch-rtl
|
In this template gulp watch-rtl command is for what ever changes made in scss folder, will watch and run an appropriate task.
All the CSS files under assets/css-rtl/ folder will be watched and upon changes made to these files, the styles task will be executed.
|
gulp dark-rtl
|
In this template gulp dark-rtl command is for what ever changes that are made in style-dark.scss will be watched and the changes automatically updated in style-dark.css file in css folder.
|
gulp sidemenu-rtl
|
In this template gulp sidemenu-rtl command is for what ever changes are made in sidemenu.scss will be watched and the changes automatically updated in sidemenu.css file in css folder.
|
gulp skin-rtl
|
In this template gulp skin-rtl command is for what ever changes are made in skin-modes.scss will be watched and the changes automatically updated in skin-modes.css file in css folder.
|
gulp color-rtl
|
In this template gulp color-rtl command is for what ever changes are made in colors folder will be watched and the changes automatically updated in color.css file in css folder.
|
gulp icontext-rtl
|
In this template gulp icontext-rtl command is for what ever changes are made in sidemenu-icontext.scss will be watched and the changes automatically updated in sidemenu-icontext.css file in css folder.
|
gulp icon-rtl
|
In this template gulp icon-rtl command is for what ever changes are made in sidemenu-icon.scss will be watched and the changes automatically updated in sidemenu-icon.css file in css folder.
|
Folder Structure
							├── ltr/
							|   ├── __pycache__
							|   ├── migrations
							|   ├── templates/
							|   |   ├── components
							|   |   |   ├── layouts
							|   |   |   ├── versions
							|   |   |   ├── base.html
							|   |   |   └── custom-base.html
							|   |   └── ltr
							|   |       └── .html files (93)
							|   ├── __init__.py
							|   ├── admin.py
							|   ├── apps.py
							|   ├── models.py
							|   ├── tests.py
							|   ├── urls.py
							|   └── views.py
							├── rtl/
							|   ├── __pycache__
							|   ├── migrations
							|   ├── templates/
							|   |   ├── components-rtl
							|   |   |   ├── layouts
							|   |   |   ├── versions
							|   |   |   ├── base.html
							|   |   |   └── custom-base.html
							|   |   └── rtl
							|   |       └── .html files (93)
							|   ├── __init__.py
							|   ├── admin.py
							|   ├── apps.py
							|   ├── models.py
							|   ├── tests.py
							|   ├── urls.py
							|   └── views.py
							├── static/
							|   └── assets
							├── Zanex/
							|   ├── __pycache__
							|   ├── __init__.py
							|   ├── asgi.py
							|   ├── settings.py
							|   ├── urls.py
							|   └── wsgi.py
							├── db.sqlite3
							├── gulpfile
							├── manage.py
							└── package.json
FAQS
How to Change Font Style ?
Step 1:
Go To _fonts.scss (assets/scss/custom/fonts/_fonts.scss )
if you want to change another font-family Go to the site Google Fonts And Slect One font Family and import In to style.css file
How to Select font Family
Example:
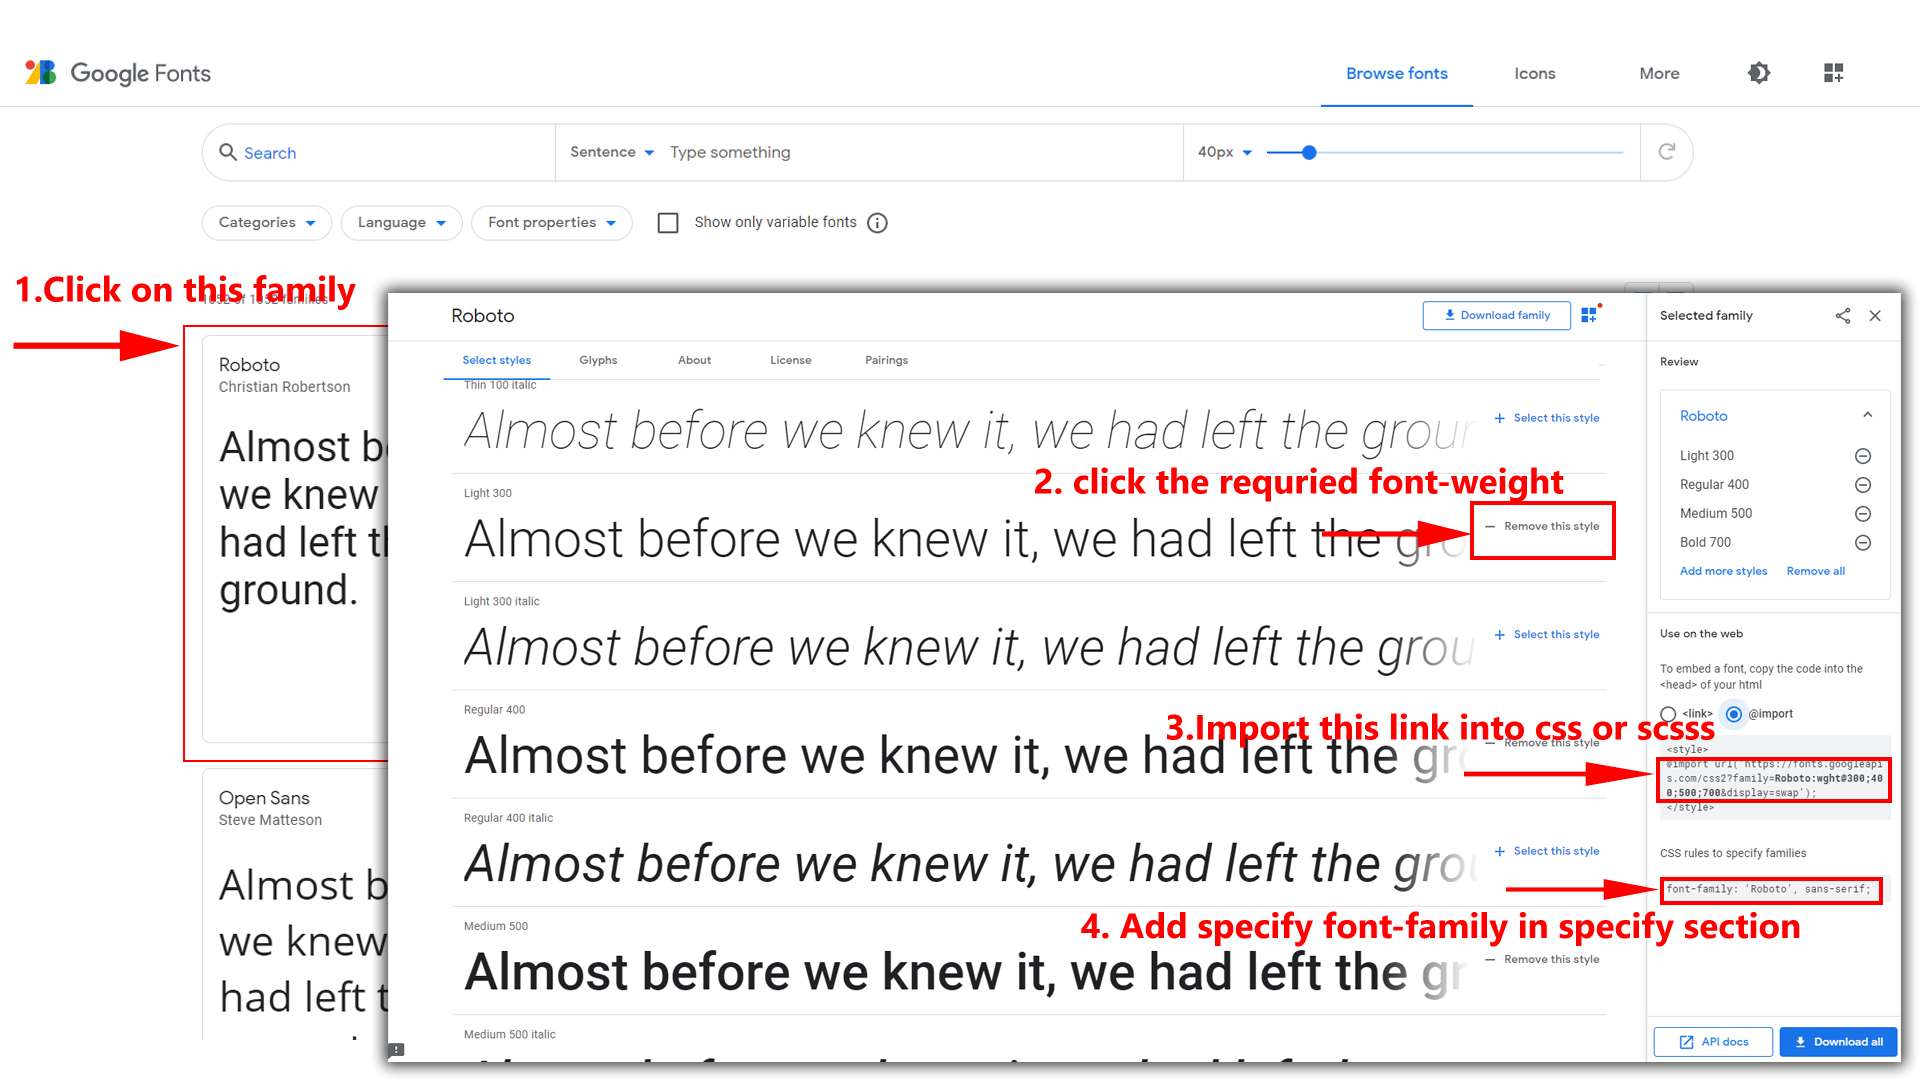
Step 2:
And paste Your Selected font-family in _fonts.scss
Example:
@import url("https://fonts.googleapis.com/css?family=Roboto:300,400,500,700,900");
Step 3:
And add the Your Selected font-family in _bootstrap-styles.scss(assets/scss/bootstrap/_bootstrap-styles.scss)
Example:
body {
	margin: 0;
	font-family: "Roboto", sans-serif;
	font-size: 14px;
	font-weight: 400;
	line-height: 1.5;
	color: $default-color;
	text-align: left;
	background-color: $background;
}
How to Change Logo ?
Go To "assets/images/brand" folder and replace your logo with Previous Logos within in image size. note: Please don't increase logo sizes. Replace your logo within given image size. otherwise the logo will not fit in particular place it disturbs the template design.
How to Enable Darktheme?
Go to static/assets/js and open custom.js file in an editor and drag down to SWITCHER-toggle and remove comments for dark-mode to enable dark-mode style as shown in below
/*Theme Layouts*/
//$('body').addClass('dark-mode');
dark-mode as shown below
/*Theme Layouts*/
$('body').addClass('dark-mode');
How to Enable Color-header?
Go to static/assets/js and open custom.js file in an editor and drag down to Header Styles. and remove comments for color-header to enable color-header style as shown in below
/*Header Styles*/

//$('body').addClass('color-header')
color-header as shown below
/*Header Styles*/

$('body').addClass('color-header')
How to Enable Dark-header?
Go to static/assets/js and open custom.js file in an editor and drag down to Header Styles. and remove comments for dark-header to enable dark-header style as shown in below
/*Header Styles*/

//$('body').addClass('dark-header');
dark-header as shown below
/*Header Styles*/

$('body').addClass('dark-header');
How to Enable Light-header?
Go to static/assets/js and open custom.js file in an editor and drag down to Header Styles. and remove comments for light-header to enable light-header style as shown in below
/*Header Styles*/

//$('body').addClass('light-header');
light-header as shown below
/*Header Styles*/

$('body').addClass('light-header');
How to Enable Gradient-header?
Go to static/assets/js and open custom.js file in an editor and drag down to Header Styles. and remove comments for gradient-header to enable gradient-header style as shown in below
/*Header Styles*/

//$('body').addClass('gradient-header');
gradient-header as shown below
/*Header Styles*/

$('body').addClass('gradient-header');
How to Enable Horizontalmenu light?
Go to static/assets/js and open custom.js file in an editor and drag down to Horizontal-menu Styles. and remove comments for light-hormenu to enable light-hormenu style as shown in below
/*Horizontal-menu Styles*/
//$('body').addClass('light-hormenu');
light-hormenu as shown below
/*Horizontal-menu Styles*/
$('body').addClass('light-hormenu');
How to Enable Horizontalmenu Color?
Go to static/assets/js and open custom.js file in an editor and drag down to Horizontal-menu Styles. and remove comments for color-hormenu to enable color-hormenu style as shown in below
/*Horizontal-menu Styles*/

//$('body').addClass('color-hormenu');
color-hormenu as shown below
/*Horizontal-menu Styles*/

$('body').addClass('color-hormenu');
How to Enable Horizontalmenu Dark?
Go to static/assets/js and open custom.js file in an editor and drag down to Horizontal-menu Styles. and remove comments for dark-hormenu to enable dark-hormenu style as shown in below
/*Horizontal-menu Styles*/

//$('body').addClass('dark-hormenu');
dark-hormenu as shown below
/*Horizontal-menu Styles*/

$('body').addClass('dark-hormenu');
How to Enable Horizontalmenu Gradient?
Go to static/assets/js and open custom.js file in an editor and drag down to Horizontal-menu Styles. and remove comments for gradient-hormenu to enable gradient-hormenu style as shown in below
/*Horizontal-menu Styles*/

//$('body').addClass('gradient-hormenu');
gradient-hormenu as shown below
/*Horizontal-menu Styles*/

$('body').addClass('gradient-hormenu');
How to Enable Verticalmenu light?
Go to static/assets/js and open custom.js file in an editor and drag down to Left-menu Styles. and remove comments for light-menu to enable light-menu style as shown in below
/*Left-menu Styles*/
//$('body').addClass('light-menu');
light-menu as shown below
/*Left-menu Styles*/

 $('body').addClass('light-menu');
How to Enable Verticalmenu Color?
Go to static/assets/js and open custom.js file in an editor and drag down to Left-menu Styles. and remove comments for color-menu to enable color-menu style as shown in below
/*Left-menu Styles*/
//$('body').addClass('color-menu');
color-menu as shown below
/*Left-menu Styles*/
$('body').addClass('color-menu');
How to Enable Verticalmenu Dark?
Go to static/assets/js and open custom.js file in an editor and drag down to Leftmenu Style. and remove comments for dark-menu to enable dark-menu style as shown in below
/*Leftmenu Styles*/
//$('body').addClass('dark-menu');
dark-menu as shown below
/*Leftmenu Styles*/
$('body').addClass('dark-menu');
How to Enable Verticalmenu Gradient?
Go to static/assets/js and open custom.js file in an editor and drag down to Leftmenu Style. and remove comments for gradient-menu to enable gradient-menu style as shown in below
/*Leftmenu Styles*/
//$('body').addClass('gradient-menu');
gradient-menu as shown below
/*Leftmenu Styles*/
$('body').addClass('gradient-menu');
How to Enable Boxed-Layout?
Go to static/assets/js and open custom.js file in an editor and drag down to Layout-width Styles. and remove comments for layout-boxed to enable layout-boxed style as shown in below
/*Layout-width Styles*/
// $('body').addClass('layout-boxed');
layout-boxed as shown below
/*Layout-width Styles*/
$('body').addClass('layout-boxed');
How to Enable Scrollable-Layout?
Go to static/assets/js and open custom.js file in an editor and drag down to Header-Position Styles. and remove comments for scrollable-layout to enable scrollable-layout style as shown below
/*Header-Position Styles*/
// $('body').addClass('scrollable-layout');
scrollable-layout as shown below
/*Header-Position Styles*/
$('body').addClass('scrollable-layout');
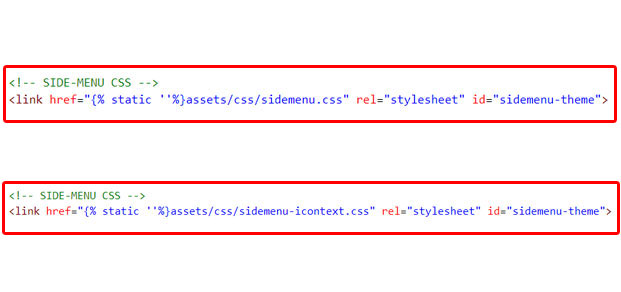
How to Enable Sidemenu-Icon-with Text?
Please Follow the below steps
Step1:
Go To rtl or ltr/templates/components/layouts/vertical and open styles.php file in editor you will find sidemenu.css then change sidemenu.css to sidemenu-icontext.css style link. check below Image
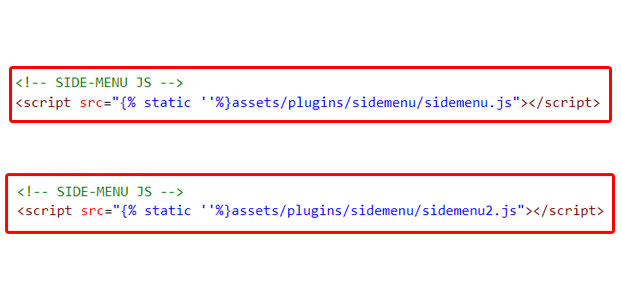
Step2:
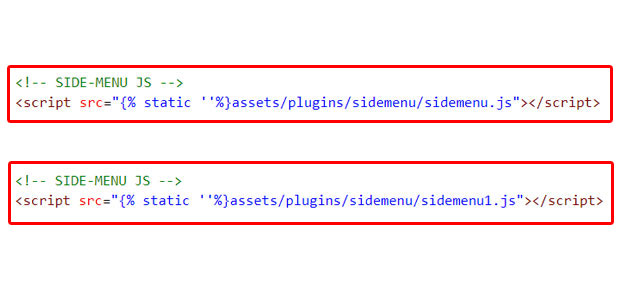
Go To rtl or ltr/templates/components/layouts/vertical and open scripts.php file in editor and change sidemenu.js to sidemenu.js1 in link. check below Image
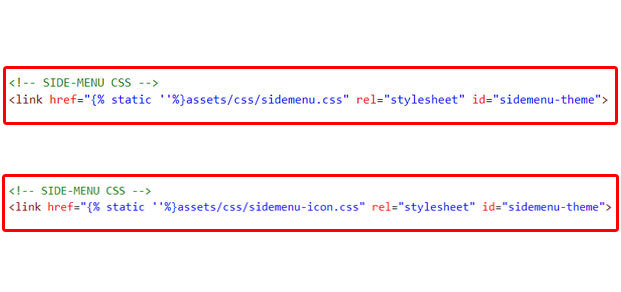
How to Enable Sidemenu-Icon?
Please Follow the below steps
Step1:
Go To rtl or ltr/templates/components/layouts/vertical and open styles.php file in editor you will find sidemenu.css then change sidemenu.css to sidemenu-icon.css style link. check below Image
Step2:
Go To rtl or ltr/templates/components/layouts/vertical and open scripts.php file in editor and change sidemenu.js to sidemenu.js1 in link. check below Image
Sources
- Bootstrap FrameWork
- https://getbootstrap.com/
- Jquery
- https://jquery.com/
- Jquery Datepicker
- https://jqueryui.com/datepicker/
- Full Calendar
- https://fullcalendar.io/
- File Uploads
- https://www.jqueryscript.net/demo/jQuery-Plugin-To-Beautify-File-Inputs-with-Custom-Styles-Dropify/
- mcustomScrollbar
- http://manos.malihu.gr/jquery-custom-content-scroller/
- Select2
- https://select2.org/
- Jquery Timepicker
- https://jonthornton.github.io/jquery-timepicker/
- Bootstrap-wizard
- http://vinceg.github.io/twitter-bootstrap-wizard/
- Datatable
- https://datatables.net/examples/styling/bootstrap4
- Font Awesome Icons
- https://fontawesome.com/
- Material Design Icons
- https://materialdesignicons.com/
- Simpleline Icons
- https://iconify.design/icon-sets/simple-line-icons/
- Ionicons
- https://ionicons.com/
- Themify Icons
- https://themify.me/themify-icons
- Bootstrap-Colorpicker
- https://farbelous.io/bootstrap-colorpicker/v2/
- Sparkline Charts
- https://omnipotent.net/jquery.sparkline/#s-about
- Echart
- https://ecomfe.github.io/echarts-examples/public/documentation.html
- Morris Chart
- https://morrisjs.github.io/morris.js/
Font Used
Google fonts are used in the template. They are as follows: Google Fonts
All Images are used: Pexels.com